Difference between revisions of "Troubleshoot TFTP"
(→Please enter TFTP server) |
|||
| (109 intermediate revisions by 4 users not shown) | |||
| Line 1: | Line 1: | ||
| + | |||
| + | |||
| + | |||
| + | == TFTP's roles in FOG == | ||
| + | |||
| + | TFTP is used to download the boot-file specified by either DHCP or ProxyDHCP. TFTP is very simple and has very little protections in place; Generally read-only is preferred for files offered by TFTP, however full permissions will work too. Normally, the boot-files for FOG are located in /tftpboot Generally, TFTP offers [http://fogproject.org/wiki/index.php/Filename_Information these boot files]. | ||
== Testing TFTP == | == Testing TFTP == | ||
| − | |||
| − | |||
| − | + | === Try to get a file with Linux === | |
| − | <pre>tftp x.x.x.x | + | |
| − | tftp | + | This is ran from a separate Linux machine, NOT your FOG server. |
| − | // | + | |
| − | + | Normally, you can use your Linux installation medium to live boot on another computer. | |
| − | + | ||
| + | <pre>tftp -v x.x.x.x -m binary -c get undionly.kpxe | ||
| + | Connected to x.x.x.x (x.x.x.x), port 69 | ||
| + | getting from x.x.x.x:undionly.kpxe to undionly.kpxe [octet] | ||
| + | Received 89509 bytes in 0.0 seconds [84047115 bit/s] | ||
| + | </pre> | ||
| + | |||
| + | === Try to get a file with Windows === | ||
| + | |||
| + | <pre>tftp -i x.x.x.x get undionly.kpxe</pre> | ||
| + | |||
| + | ==== Testing using Windows ==== | ||
| + | {{:Windows_TFTP}} | ||
| + | |||
| + | === FOG 0.32 and Below === | ||
| + | |||
| + | To test TFTP on 0.32 and below, you need to try to get the pxelinux.0 file instead of undionly.kpxe | ||
| + | You may use the above Linux & Windows methods, but simply replace the file name with pxelinux.0 | ||
| + | |||
| + | For example: | ||
| + | |||
| + | '''Windows''' | ||
| + | |||
| + | <pre>tftp –i x.x.x.x get pxelinux.0</pre> | ||
| + | |||
| + | '''Linux''' | ||
| + | |||
| + | <pre>tftp -v x.x.x.x -c get pxelinux.0</pre> | ||
| + | |||
| + | == TFTP Service == | ||
| + | |||
| + | === Fedora 20/21/22/23 === | ||
| + | |||
| + | status/enable/restart | ||
| + | <pre>systemctl status xinetd.service | ||
| + | systemctl enable xinetd.service | ||
| + | systemctl restart xinetd.service</pre> | ||
| + | |||
| + | === Ubuntu === | ||
| + | |||
| + | newer systems: | ||
| + | |||
| + | status/enable/restart | ||
| + | <pre>service tftpd-hpa status | ||
| + | service tftpd-hpa restart | ||
| + | service tftpd-hpa enable</pre> | ||
| + | |||
| + | older systems: | ||
| + | |||
| + | status/enable/restart | ||
| + | <pre>sudo /etc/init.d/xinetd status | ||
| + | sudo /etc/init.d/xinetd restart | ||
| + | sudo /etc/init.d/xinetd enable</pre> | ||
| + | |||
| + | == TFTP Settings file == | ||
| + | |||
| − | + | === Fedora: === | |
| − | |||
| + | Location: | ||
| + | <pre>/etc/xinetd.d/tftp</pre> | ||
| + | To display /etc/xinetd.d/tftp: | ||
| + | <pre>cat /etc/xinetd.d/tftp</pre> | ||
| − | + | It should look a whole lot like this: | |
| − | + | <pre># default: off | |
| + | # description: The tftp server serves files using the trivial file transfer # protocol. | ||
| + | #The tftp protocol is often used to boot diskless workstations, download configuration files to network-aware printers, | ||
| + | # and to start the installation process for some operating systems. | ||
| + | service tftp | ||
| + | { | ||
| + | socket_type = dgram | ||
| + | protocol = udp | ||
| + | wait = yes | ||
| + | user = root | ||
| + | server = /usr/sbin/in.tftpd | ||
| + | server_args = -s /tftpboot | ||
| + | disable = no | ||
| + | per_source = 11 | ||
| + | cps = 100 2 | ||
| + | flags = IPv4 | ||
| + | }</pre> | ||
| − | + | To edit /etc/xinetd.d/tftp: | |
| + | <pre>sudo vi /etc/xinetd.d/tftp</pre> | ||
| − | [[ | + | Instructions on using Vi: [[Vi]] |
| + | Explanation of settings for /etc/xinetd.d/tftp: | ||
| + | <pre>man xinetd.conf</pre> | ||
| + | === Ubuntu: === | ||
| + | Location: | ||
| + | <pre>/etc/default/tftpd-hpa</pre> | ||
| + | To display /etc/default/tftpd-hpa: | ||
| + | <pre>cat /etc/default/tftpd-hpa</pre> | ||
| + | It should look a whole lot like this: | ||
| − | == | + | <pre># /etc/default/tftpd-hpa |
| + | # FOG Modified version | ||
| + | TFTP_USERNAME="root" | ||
| + | TFTP_DIRECTORY="/tfptboot" | ||
| + | TFTP_ADDRESS="0.0.0.0:69" | ||
| + | TFTP_OPTIONS="-s" | ||
| + | # | ||
| + | # Note: TFTP_ADDRESS=":69" is also valid. | ||
| + | # "0.0.0.0:69" means to use any interface while ":69" means to use anything. | ||
| + | # If you are experiencing issues on Ubuntu or Debian with the default configuration, | ||
| + | # Remove the 0.0.0.0 part of this line above in the config. | ||
| + | # | ||
| + | </pre> | ||
| − | + | To edit /etc/default/tftpd-hpa: | |
| − | <pre> | + | <pre>sudo vi /etc/default/tftpd-hpa</pre> |
| − | |||
| − | |||
| − | + | Instructions on using Vi: [[Vi]] | |
| − | |||
| + | Explanation of settings for /etc/default/tftpd-hpa: | ||
| + | <pre>man tftpd-hpa</pre> | ||
| − | + | == FOG Configuration (web interface) == | |
| − | |||
| − | + | x.x.x.x/fog/management -> FOG Configuration -> FOG Settings -> TFTP Server -> | |
| − | + | Ensure that the below settings are set to a local FOG linux user that actually exists. Ensure correct password is provided. Ensure that the supplied user has permission to the /tftpboot directory (see permissions). | |
| − | |||
| − | + | FOG_TFTP_FTP_USERNAME | |
| − | |||
| − | + | FOG_TFTP_FTP_PASSWORD | |
| − | |||
| − | + | == Disable & Verify Firewall == | |
| + | {{:Disable & Verify Firewall}} | ||
| − | |||
| + | It's necessary to disable the Windows firewall when using windows for testing. The below image demonstrates disabling the firewall which allows TFTP traffic to pass. | ||
| + | [[File:TFTP Windows Firewall.png]] | ||
== Permissions == | == Permissions == | ||
Check permissions on /tftpboot directory by using: | Check permissions on /tftpboot directory by using: | ||
| − | <pre>ls - | + | <pre>ls -laR /tftpboot</pre> |
| − | |||
| − | |||
| − | |||
Set permissions to allow everyone full access to /tftpboot and all contents: | Set permissions to allow everyone full access to /tftpboot and all contents: | ||
| Line 75: | Line 168: | ||
See example permissions below: | See example permissions below: | ||
| − | [[File:TFTP | + | <pre>/tftpboot: |
| + | total 3960 | ||
| + | drwxr-xr-x 4 fog root 4096 Apr 29 18:37 . | ||
| + | dr-xr-xr-x. 23 root root 4096 Apr 29 18:37 .. | ||
| + | -rw-r--r-- 1 fog root 840 Apr 29 18:37 boot.txt | ||
| + | -rw-r--r-- 1 root root 397 Apr 29 18:37 default.ipxe | ||
| + | drwxr-xr-x 2 fog root 4096 Apr 29 18:37 i386-efi | ||
| + | -rw-r--r-- 1 fog root 171232 Apr 29 18:37 intel.efi | ||
| + | -rw-r--r-- 1 fog root 89120 Apr 29 18:37 intel.kkpxe | ||
| + | -rw-r--r-- 1 fog root 89168 Apr 29 18:37 intel.kpxe | ||
| + | -rw-r--r-- 1 fog root 89153 Apr 29 18:37 intel.pxe | ||
| + | -rw-r--r-- 1 fog root 890208 Apr 29 18:37 ipxe.efi | ||
| + | -rw-r--r-- 1 fog root 329014 Apr 29 18:37 ipxe.kkpxe | ||
| + | -rw-r--r-- 1 fog root 329062 Apr 29 18:37 ipxe.kpxe | ||
| + | -rw-r--r-- 1 fog root 328438 Apr 29 18:37 ipxe.krn | ||
| + | -rw-r--r-- 1 fog root 329115 Apr 29 18:37 ipxe.pxe | ||
| + | -rw-r--r-- 1 fog root 123448 Apr 29 18:37 ldlinux.c32 | ||
| + | -rw-r--r-- 1 fog root 26140 Apr 29 18:37 memdisk | ||
| + | -rw-r--r-- 1 fog root 29208 Apr 29 18:37 menu.c32 | ||
| + | -rw-r--r-- 1 fog root 43210 Apr 29 18:37 pxelinux.0 | ||
| + | -rw-r--r-- 1 fog root 43210 Apr 29 18:37 pxelinux.0.old | ||
| + | drwxr-xr-x 2 fog root 4096 Apr 29 18:37 pxelinux.cfg | ||
| + | -rw-r--r-- 1 fog root 170912 Apr 29 18:37 realtek.efi | ||
| + | -rw-r--r-- 1 fog root 90028 Apr 29 18:37 realtek.kkpxe | ||
| + | -rw-r--r-- 1 fog root 90076 Apr 29 18:37 realtek.kpxe | ||
| + | -rw-r--r-- 1 fog root 90105 Apr 29 18:37 realtek.pxe | ||
| + | -rw-r--r-- 1 fog root 170112 Apr 29 18:37 snp.efi | ||
| + | -rw-r--r-- 1 fog root 170272 Apr 29 18:37 snponly.efi | ||
| + | -rw-r--r-- 1 fog root 88763 Apr 29 18:37 undionly.kkpxe | ||
| + | -rw-r--r-- 1 fog root 88811 Apr 29 18:37 undionly.kpxe | ||
| + | -rw-r--r-- 1 fog root 88856 Apr 29 18:37 undionly.pxe | ||
| + | -rw-r--r-- 1 fog root 29728 Apr 29 18:37 vesamenu.c32 | ||
| + | |||
| + | /tftpboot/i386-efi: | ||
| + | total 1348 | ||
| + | drwxr-xr-x 2 fog root 4096 Apr 29 18:37 . | ||
| + | drwxr-xr-x 4 fog root 4096 Apr 29 18:37 .. | ||
| + | -rw-r--r-- 1 fog root 137280 Apr 29 18:37 intel.efi | ||
| + | -rw-r--r-- 1 fog root 812864 Apr 29 18:37 ipxe.efi | ||
| + | -rw-r--r-- 1 fog root 137664 Apr 29 18:37 realtek.efi | ||
| + | -rw-r--r-- 1 fog root 137088 Apr 29 18:37 snp.efi | ||
| + | -rw-r--r-- 1 fog root 137216 Apr 29 18:37 snponly.efi | ||
| + | |||
| + | /tftpboot/pxelinux.cfg: | ||
| + | total 12 | ||
| + | drwxr-xr-x 2 fog root 4096 Apr 29 18:37 . | ||
| + | drwxr-xr-x 4 fog root 4096 Apr 29 18:37 .. | ||
| + | -rw-r--r-- 1 fog root 160 Apr 29 18:37 default | ||
| + | </pre> | ||
| + | |||
| + | ==Check Network Switch settings== | ||
| + | See [[IPXE]] for network switch settings concerning STP/portfast/etc. | ||
| + | |||
| + | {{:DHCP_Settings}} | ||
| + | |||
| + | == Troubleshooting == | ||
| + | |||
| + | Using DHCP or ProxyDHCP, you can capture the packets sent to and from a particular host using TCPDump. | ||
| + | |||
| + | {{:TCPDump}} | ||
| + | |||
| + | |||
| + | Using the above method and filter, this is what a '''BROKEN''' Option 067 (or ProxyDHCP) conversation '''might''' look like: | ||
| + | |||
| + | [[File:Broken dnsmasq.png]] | ||
| + | |||
| + | In this case, DHCP (or dnsmasq) boot file name is not configured correctly, the boot file does not exist, or TFTP is not configured properly. | ||
| + | |||
| + | == Common problems and fixes == | ||
| + | |||
| + | |||
| + | === My problem isn't in the WiKi! === | ||
| + | |||
| + | {{:My problem isn't in the WiKi!}} | ||
| + | |||
| + | === Please enter tftp server: === | ||
| + | |||
| + | ==== Description ==== | ||
| + | |||
| + | When trying to network boot to FOG, you are presented with a prompt similar to the below picture: | ||
| + | |||
| + | [[File:Please enter tftp server.png]] | ||
| + | |||
| + | ==== Solution ==== | ||
| + | |||
| + | Typically this is caused by two or more DHCP services running on one network, and one or more of them being incorrectly configured for FOG. The administrator may or may not know of these DHCP services, one or more of them could be a rogue DHCP service. You can find a rogue DHCP service by running Wireshark on a computer and applying the filter <font color="red">bootp</font> to only see DHCP traffic, and then doing several IP releases and renews. Any rogue DHCP service should show up in the replies. | ||
| + | |||
| + | Another cause of this problem, although less common, is that Option 066/next-server is not configured on the only DHCP server in the environment. Find instructions on correcting this here: [[Modifying existing DHCP server to work with FOG]] | ||
| + | |||
| + | === Failed to load libcom32.c32 / Failed to load COM32 file vesamenu.c32 === | ||
| + | |||
| + | ==== Description ==== | ||
| + | |||
| + | You see a rolling error that says: | ||
| + | <pre>Failed to load libcom32.c32 | ||
| + | Failed to load COM32 file vesamenu.c32</pre> | ||
| + | |||
| + | And the host won't boot to the network. | ||
| + | |||
| + | ==== Solution ==== | ||
| + | |||
| + | This error has been seen in FOG Trunk (r3500s), and could possibly occur in 1.2.0 also. | ||
| + | |||
| + | This is caused by DHCP option 067 being set to pxelinux.0 | ||
| + | |||
| + | Some people have large DHCP scopes set. Sometimes a higher-up global scope/setting can override local scope settings for a particular site. | ||
| + | |||
| + | Whatever the case, DHCP is indeed handing out pxelinux.0 and that's generally not advised. | ||
| + | |||
| + | For ProxyDHCP users (dnsmasq), you should look to see what boot file is being handed out. | ||
| + | |||
| + | For those that have inherited / upgraded a FOG server and are trying to use standard DHCP for 066 and 067, it's possible that ProxyDHCP might be running on your FOG server, and it's possible that ProxyDHCP is re-setting 067 on your network hosts to an incorrect value of pxelinux.0 which would cause this error. | ||
| + | |||
| + | You should use either undionly.kpxe or undionly.kkpxe for BIOS booting for option 067, or use any of the .efi files inside of /tftpboot for UEFI booting. | ||
| + | |||
| + | Please see this article for more details about the various boot files available in fog: [[Filename Information]] | ||
| + | |||
| + | === Could not boot: Connection timed out (http://ipxe.org/4c0a6035) === | ||
| + | |||
| + | ==== Description ==== | ||
| + | |||
| + | You get a timeout error, either after installing or updating the FOG server, or after changing the FOG server's IP address. | ||
| + | |||
| + | The error is similar to the picture below: | ||
| + | |||
| + | [[File:WrongIP for iPXE.png]] | ||
| + | |||
| + | ==== Solution ==== | ||
| + | |||
| + | Edit the file <font color="red">/tftpboot/default.ipxe</font> (it's a text file) | ||
| + | |||
| + | Somewhere around the bottom of the file, you will see a line that looks like below, where x.x.x.x should be your FOG Server's current IP address. If the IP is wrong, fix it and save the file. | ||
| + | |||
| + | <pre>chain http://x.x.x.x/fog/service/ipxe/boot.php##params</pre> | ||
| + | |||
| + | Also edit the <font color="red">/opt/fog/.fogsettings</font> file to make sure you have the correct IP address assigned in there, so that when you update in the future, this doesn't happen again. | ||
| + | |||
| + | |||
| + | === Unable to connect to tftp server === | ||
| + | |||
| + | ==== For Versions Before 0.24 ==== | ||
| + | |||
| + | |||
| + | This seems to be caused by a password issue, | ||
| + | |||
| + | 1. From the fog management interface, go to users. | ||
| + | 2. Reset the fog user password. | ||
| + | 3. Click the "I" icon - "Other Information" | ||
| + | 4. Click "Fog Settings" in the menu on the left | ||
| + | 5. Replace the FOG_TFTP_FTP_PASSWORD and the FOG_NFS_FTP_PASSWORD fields under FOG settings with | ||
| + | your Linux fog user password. (Seems like FOG_NFS_FTP_PASSWORD is gone for ver .24). | ||
| + | |||
| + | ==== For Versions .24-.32 ==== | ||
| + | |||
| + | *Reset the local password for user fog with: [sudo] passwd fog | ||
| + | *In management front end, go to '''Storage Management''' -> '''All Storage Nodes''' | ||
| + | *Click on '''DefaultMember''' | ||
| + | *Change the '''Management Password''' to match the password you just changed. | ||
| + | *Then go to '''Other Information''' and change '''FOG_TFTP_FTP_PASSWORD''' also. | ||
| + | |||
| + | |||
| + | * Go to your fog web location, on Red Hat and CentOS is in: | ||
| + | /var/www/html/fog/ | ||
| + | |||
| + | Then open the file: | ||
| + | /commons/config.php | ||
| + | |||
| + | and check the values of: | ||
| + | '''TFTP_FTP_PASSWORD''' and '''STORAGE_FTP_PASSWORD''' | ||
| + | |||
| + | These '''MUST''' match the password you set above, if not write them properly in here | ||
| + | |||
| + | Finally reload of the service | ||
| + | |||
| + | /etc/init.d/vsftpd reload | ||
| + | |||
| + | ---- | ||
| + | ==== Verify Server Settings ==== | ||
| + | |||
| + | If you have modified your server setup since first install, then the new changes must be updated and verified in the '''Fog Settings''' menu. | ||
| + | It might not be enough to just re-run the installer. | ||
| + | For instance, a new IP lease will cause the server to show the '''Unable to connect to tftp server''' error message. | ||
| + | |||
| + | * Go to the "I" icon, which is the '''About''' menu in 0.29 | ||
| + | * Select '''Fog Settings''' and navigate down to '''TFTP Settings''' and verify that all options are correct for your setup. | ||
| + | |||
| + | ==== Ensure nothing else on the network is conflicting with the DHCP server ==== | ||
| + | |||
| + | I had this error the past two days and tried all of the standard suggestions. Finally Wireshark came to the rescue. I discovered a second, feral DHCP server on the network that wasn't issuing IP addresses but must have been running interference somehow. When I disconnected it from the network, PXE boot worked as expected. | ||
Latest revision as of 16:05, 12 October 2016
Contents
- 1 TFTP's roles in FOG
- 2 Testing TFTP
- 3 TFTP Service
- 4 TFTP Settings file
- 5 FOG Configuration (web interface)
- 6 Disable & Verify Firewall
- 7 Permissions
- 8 Check Network Switch settings
- 9 DHCP Settings
- 10 Non-Linux DHCP
- 11 Other DHCP Configurations
- 12 Troubleshooting
- 13 Common problems and fixes
TFTP's roles in FOG
TFTP is used to download the boot-file specified by either DHCP or ProxyDHCP. TFTP is very simple and has very little protections in place; Generally read-only is preferred for files offered by TFTP, however full permissions will work too. Normally, the boot-files for FOG are located in /tftpboot Generally, TFTP offers these boot files.
Testing TFTP
Try to get a file with Linux
This is ran from a separate Linux machine, NOT your FOG server.
Normally, you can use your Linux installation medium to live boot on another computer.
tftp -v x.x.x.x -m binary -c get undionly.kpxe
Connected to x.x.x.x (x.x.x.x), port 69
getting from x.x.x.x:undionly.kpxe to undionly.kpxe [octet]
Received 89509 bytes in 0.0 seconds [84047115 bit/s]
Try to get a file with Windows
tftp -i x.x.x.x get undionly.kpxe
Testing using Windows
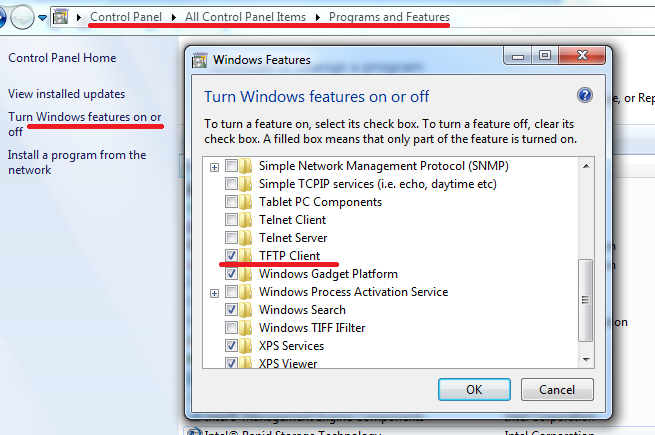
To test from windows, TFTP Client must be installed and the Firewall must allow TFTP Traffic. The best way to guarantee that your windows firewall isn't blocking TFTP is to turn it off during your troubleshooting.
Using Windows 7 Pro:
Control Panel -> Programs and Features -> Turn Windows Features on or off -> TFTP Client
FOG 0.32 and Below
To test TFTP on 0.32 and below, you need to try to get the pxelinux.0 file instead of undionly.kpxe You may use the above Linux & Windows methods, but simply replace the file name with pxelinux.0
For example:
Windows
tftp –i x.x.x.x get pxelinux.0
Linux
tftp -v x.x.x.x -c get pxelinux.0
TFTP Service
Fedora 20/21/22/23
status/enable/restart
systemctl status xinetd.service
systemctl enable xinetd.service
systemctl restart xinetd.service
Ubuntu
newer systems:
status/enable/restart
service tftpd-hpa status
service tftpd-hpa restart
service tftpd-hpa enable
older systems:
status/enable/restart
sudo /etc/init.d/xinetd status
sudo /etc/init.d/xinetd restart
sudo /etc/init.d/xinetd enable
TFTP Settings file
Fedora:
Location:
/etc/xinetd.d/tftp
To display /etc/xinetd.d/tftp:
cat /etc/xinetd.d/tftp
It should look a whole lot like this:
# default: off
# description: The tftp server serves files using the trivial file transfer #   protocol.
#The tftp protocol is often used to boot diskless workstations, download configuration files to network-aware printers,
# and to start the installation process for some operating systems.
service tftp
{
        socket_type             = dgram
        protocol                = udp
        wait                    = yes
        user                    = root
        server                  = /usr/sbin/in.tftpd
        server_args             = -s /tftpboot
        disable                 = no
        per_source              = 11
        cps                     = 100 2
        flags                   = IPv4
}
To edit /etc/xinetd.d/tftp:
sudo vi /etc/xinetd.d/tftp
Instructions on using Vi: Vi
Explanation of settings for /etc/xinetd.d/tftp:
man xinetd.conf
Ubuntu:
Location:
/etc/default/tftpd-hpa
To display /etc/default/tftpd-hpa:
cat /etc/default/tftpd-hpa
It should look a whole lot like this:
# /etc/default/tftpd-hpa
# FOG Modified version
TFTP_USERNAME="root"
TFTP_DIRECTORY="/tfptboot"
TFTP_ADDRESS="0.0.0.0:69"
TFTP_OPTIONS="-s"
#
# Note: TFTP_ADDRESS=":69" is also valid.
# "0.0.0.0:69" means to use any interface while ":69" means to use anything.
# If you are experiencing issues on Ubuntu or Debian with the default configuration,
# Remove the 0.0.0.0 part of this line above in the config.
#
To edit /etc/default/tftpd-hpa:
sudo vi /etc/default/tftpd-hpa
Instructions on using Vi: Vi
Explanation of settings for /etc/default/tftpd-hpa:
man tftpd-hpa
FOG Configuration (web interface)
x.x.x.x/fog/management -> FOG Configuration -> FOG Settings -> TFTP Server ->
Ensure that the below settings are set to a local FOG linux user that actually exists. Ensure correct password is provided. Ensure that the supplied user has permission to the /tftpboot directory (see permissions).
FOG_TFTP_FTP_USERNAME
FOG_TFTP_FTP_PASSWORD
Disable & Verify Firewall
Fedora 20/21/22/23
Disable/stop Firewall
systemctl disable firewalld.service
systemctl stop firewalld.service
Can be undone with "start" and "enable".
Check Firewall in Fedora 20/21/22/23
systemctl status firewalld.service
Fedora 16
Add /bin/bash to /etc/shells as the vsftpd yum install does not do it correctly causing tftp timeout message
Debian/Ubuntu
sudo iptables -L
If disabled, the output should look like this:
Chain INPUT (policy ACCEPT)
target prot opt source destination

Chain FORWARD (policy ACCEPT)
target prot opt source destination

Chain OUTPUT (policy ACCEPT)
target prot opt source destination
Disable Ubuntu Firewall
sudo ufw disable
Disable Debian Firewall
iptables -F
iptables -X
iptables -t nat -F
iptables -t nat -X
iptables -t mangle -F
iptables -t mangle -X
iptables -P INPUT ACCEPT
iptables -P OUTPUT ACCEPT
iptables -P FORWARD ACCEPT
Other debian settings:
/etc/hosts.deny
This setting in the above file will deny traffic from any source except locally:
ALL:ALL EXCEPT 127.0.0.1:DENY
Comment out this line like so:
#ALL:ALL EXCEPT 127.0.0.1:DENY
Windows 7
Start -> Control Panel -> View by "Small icons" -> Windows Firewall -> Turn Windows Firewall On or Off -> Turn off all three.
Configuring firewall on Linux
To set the firewall for Linux to only allow what is necessary, please see the FOG security article.
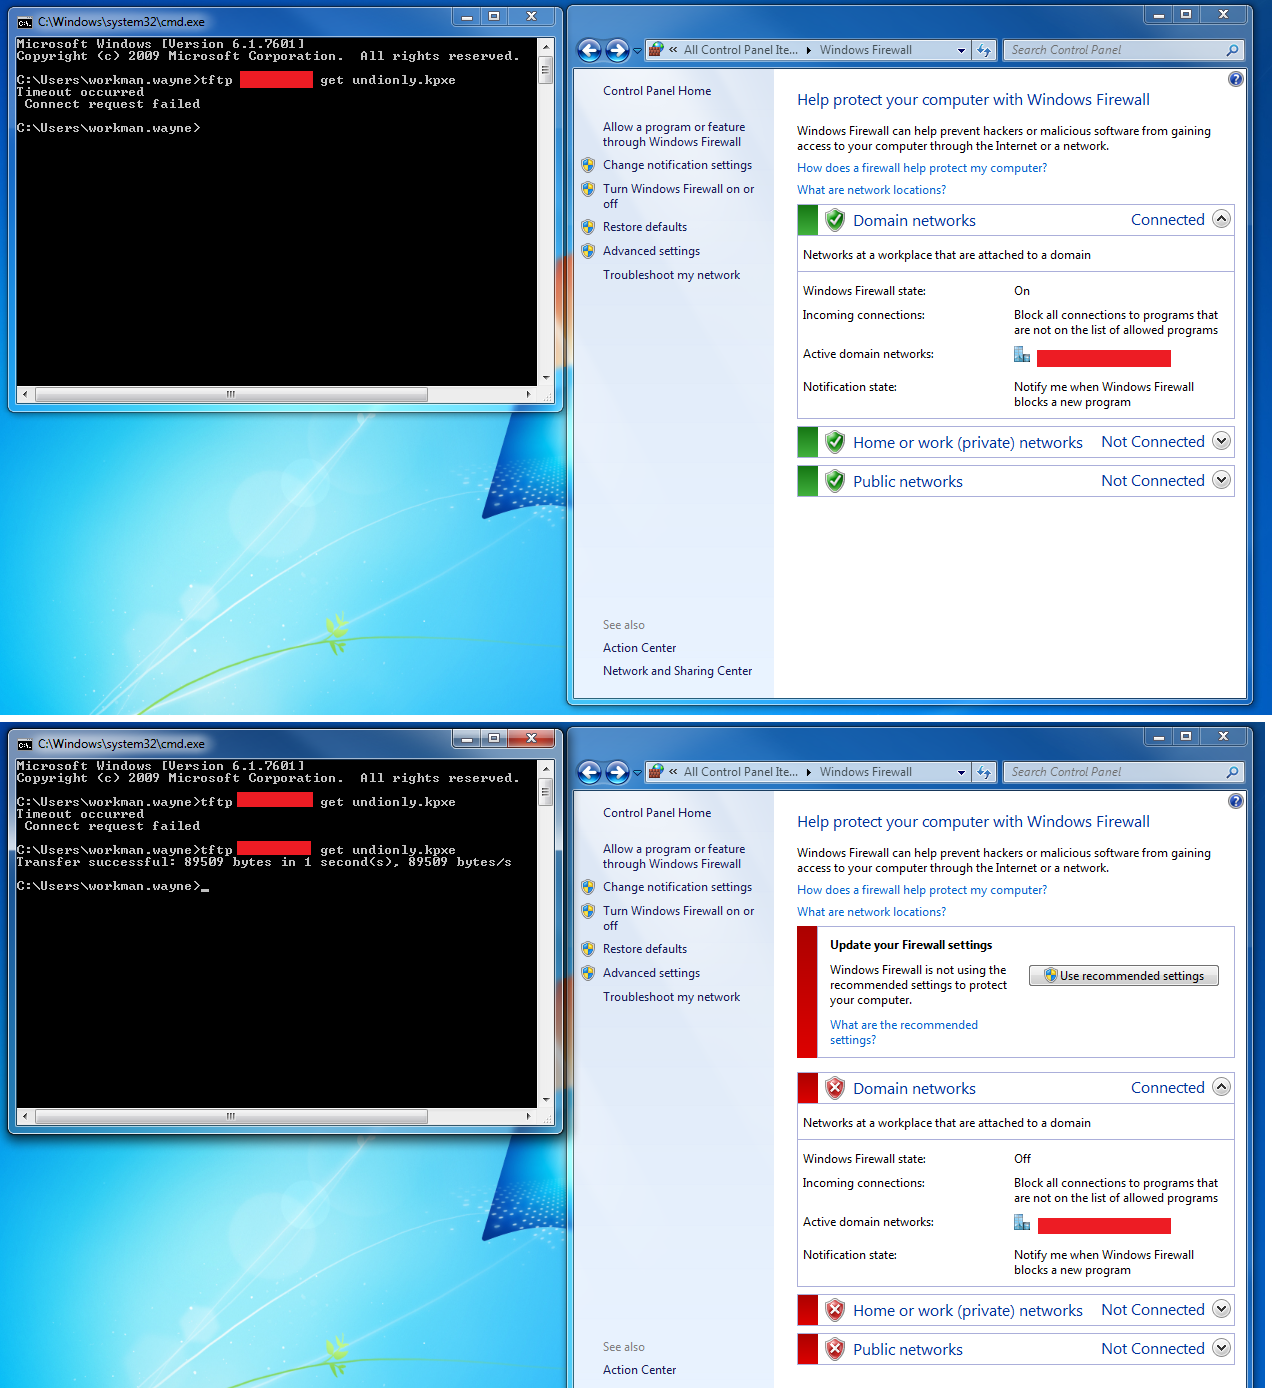
It's necessary to disable the Windows firewall when using windows for testing. The below image demonstrates disabling the firewall which allows TFTP traffic to pass.
Permissions
Check permissions on /tftpboot directory by using:
ls -laR /tftpboot
Set permissions to allow everyone full access to /tftpboot and all contents:
chmod -R 777 /tftpboot
See example permissions below:
/tftpboot:
total 3960
drwxr-xr-x   4 fog  root   4096 Apr 29 18:37 .
dr-xr-xr-x. 23 root root   4096 Apr 29 18:37 ..
-rw-r--r--   1 fog  root    840 Apr 29 18:37 boot.txt
-rw-r--r--   1 root root    397 Apr 29 18:37 default.ipxe
drwxr-xr-x   2 fog  root   4096 Apr 29 18:37 i386-efi
-rw-r--r--   1 fog  root 171232 Apr 29 18:37 intel.efi
-rw-r--r--   1 fog  root  89120 Apr 29 18:37 intel.kkpxe
-rw-r--r--   1 fog  root  89168 Apr 29 18:37 intel.kpxe
-rw-r--r--   1 fog  root  89153 Apr 29 18:37 intel.pxe
-rw-r--r--   1 fog  root 890208 Apr 29 18:37 ipxe.efi
-rw-r--r--   1 fog  root 329014 Apr 29 18:37 ipxe.kkpxe
-rw-r--r--   1 fog  root 329062 Apr 29 18:37 ipxe.kpxe
-rw-r--r--   1 fog  root 328438 Apr 29 18:37 ipxe.krn
-rw-r--r--   1 fog  root 329115 Apr 29 18:37 ipxe.pxe
-rw-r--r--   1 fog  root 123448 Apr 29 18:37 ldlinux.c32
-rw-r--r--   1 fog  root  26140 Apr 29 18:37 memdisk
-rw-r--r--   1 fog  root  29208 Apr 29 18:37 menu.c32
-rw-r--r--   1 fog  root  43210 Apr 29 18:37 pxelinux.0
-rw-r--r--   1 fog  root  43210 Apr 29 18:37 pxelinux.0.old
drwxr-xr-x   2 fog  root   4096 Apr 29 18:37 pxelinux.cfg
-rw-r--r--   1 fog  root 170912 Apr 29 18:37 realtek.efi
-rw-r--r--   1 fog  root  90028 Apr 29 18:37 realtek.kkpxe
-rw-r--r--   1 fog  root  90076 Apr 29 18:37 realtek.kpxe
-rw-r--r--   1 fog  root  90105 Apr 29 18:37 realtek.pxe
-rw-r--r--   1 fog  root 170112 Apr 29 18:37 snp.efi
-rw-r--r--   1 fog  root 170272 Apr 29 18:37 snponly.efi
-rw-r--r--   1 fog  root  88763 Apr 29 18:37 undionly.kkpxe
-rw-r--r--   1 fog  root  88811 Apr 29 18:37 undionly.kpxe
-rw-r--r--   1 fog  root  88856 Apr 29 18:37 undionly.pxe
-rw-r--r--   1 fog  root  29728 Apr 29 18:37 vesamenu.c32

/tftpboot/i386-efi:
total 1348
drwxr-xr-x 2 fog root   4096 Apr 29 18:37 .
drwxr-xr-x 4 fog root   4096 Apr 29 18:37 ..
-rw-r--r-- 1 fog root 137280 Apr 29 18:37 intel.efi
-rw-r--r-- 1 fog root 812864 Apr 29 18:37 ipxe.efi
-rw-r--r-- 1 fog root 137664 Apr 29 18:37 realtek.efi
-rw-r--r-- 1 fog root 137088 Apr 29 18:37 snp.efi
-rw-r--r-- 1 fog root 137216 Apr 29 18:37 snponly.efi

/tftpboot/pxelinux.cfg:
total 12
drwxr-xr-x 2 fog root 4096 Apr 29 18:37 .
drwxr-xr-x 4 fog root 4096 Apr 29 18:37 ..
-rw-r--r-- 1 fog root  160 Apr 29 18:37 default
Check Network Switch settings
See IPXE for network switch settings concerning STP/portfast/etc.
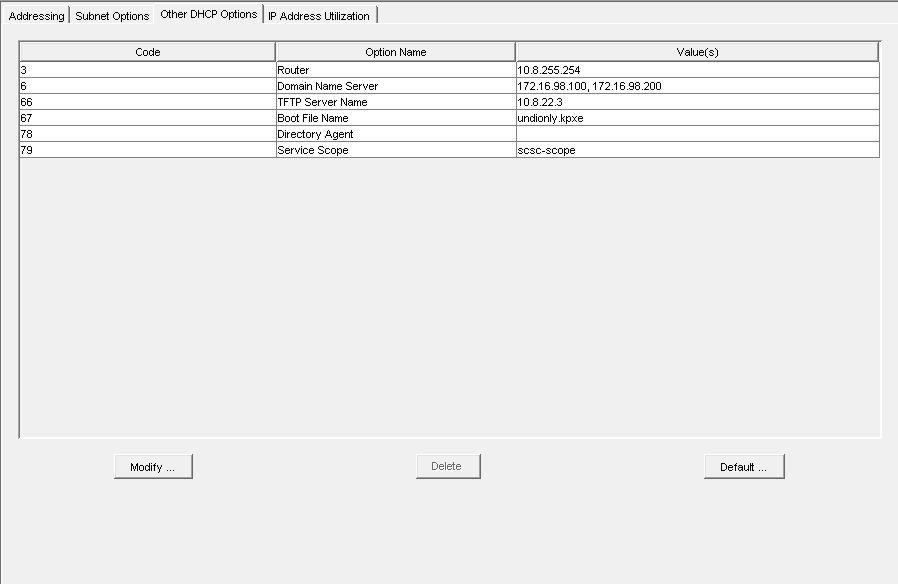
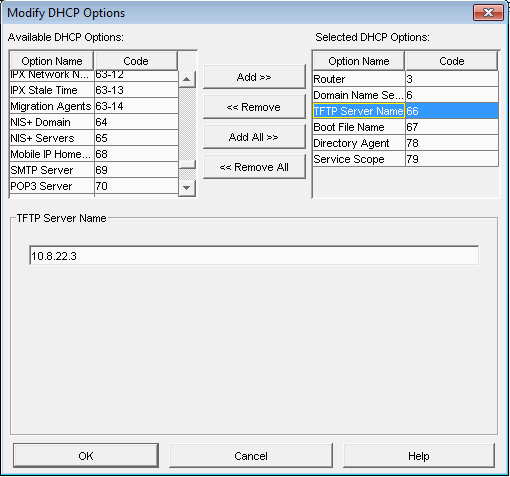
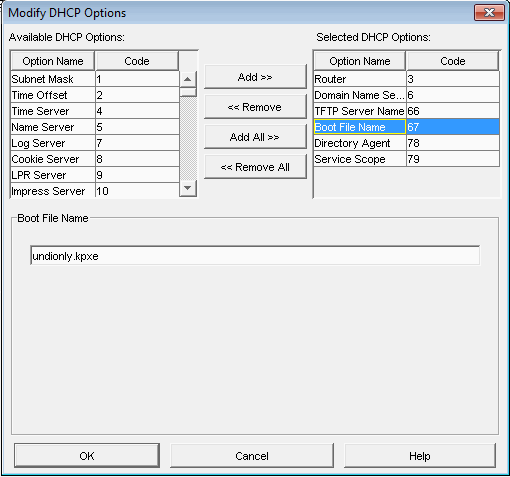
DHCP Settings
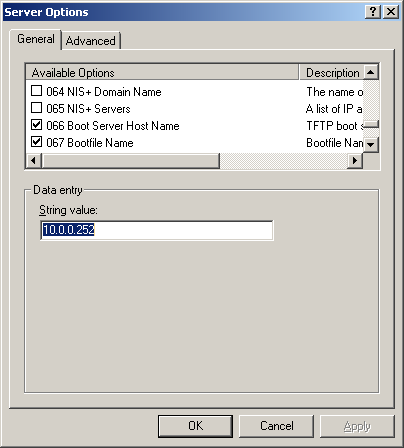
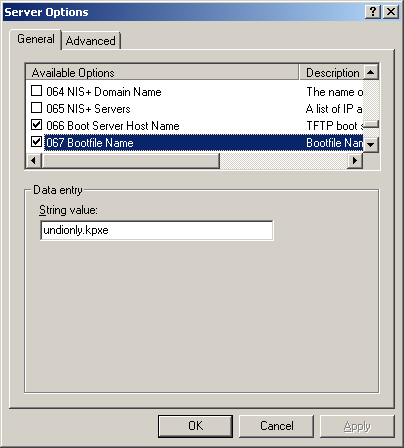
- It is important to know that versions 0.32 and below use pxelinux.0 for option 67 in DHCP
- For all versions 0.33 to current(1.3.0beta) use undionly.kpxe is generally recommended for option 67.
- Other files that can be used are listed in your directory "/tftpboot"
Linux Based (ISC-DHCP)
Articles related to ISC-DHCP
Fedora 21 Server#Verify Fedora DHCP config (if_using_DHCP)
FOG dnsmasq (ProxyDHCP)
- You would use ProxyDHCP if you do not have access to your DHCP server, or are using a device that isn't capable of specifying option 066 and 067 (next server and file name). The most popular ProxyDHCP method with fog is dnsmasq. This article will walk you through that:
- Not required unless you have an unmodifiable DHCP server/
Using_FOG_with_an_unmodifiable_DHCP_server/_Using_FOG_with_no_DHCP_server
Non-Linux DHCP
If you do not use FOG to provide DHCP services, the following sections will give some indication of settings for DHCP servers on various platforms.
Windows Server DHCP
Novell (Linux) Server DHCP
Here is a link from Novell's website on how to setup their DHCP server: http://www.novell.com/coolsolutions/feature/17719.html
MAC Server DHCP
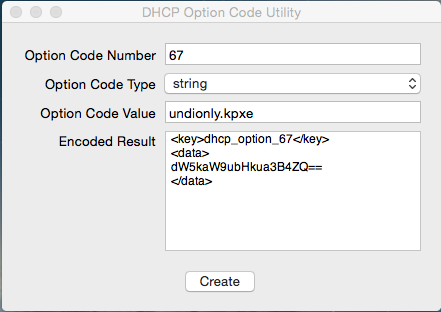
Use OS X Server app to install and utilize DHCP.
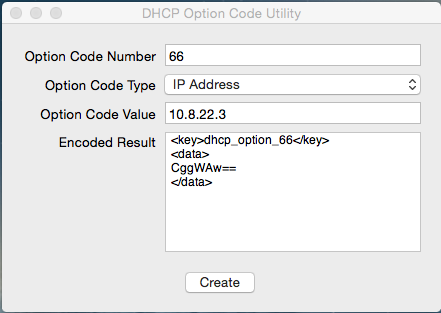
Use DHCP Option Code Utility to generate the code necessary.
https://docs.google.com/uc?id=0BwD4il5Z1G6fTmFFYU91bDNuRmc&export=download
One MUST generate the codes in order for PXE booting to work!
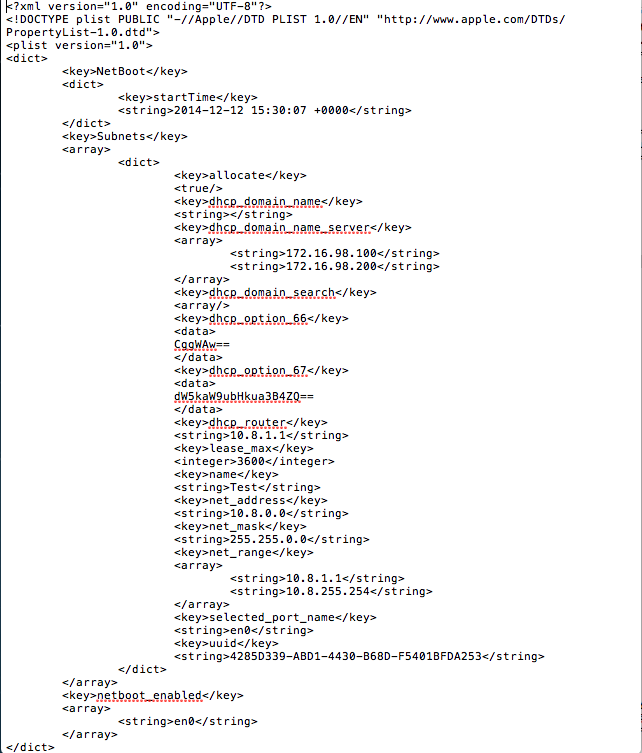
bootpd.plist is located in /etc/bootpd.plist
- Sample bootpd.plist
- This is a sample file DO NOT USE THIS IN YOUR ENVIRONMENT!!!! OS X Server app will generate most of this code for you, this example file is to show you the place where the generated code needs to be placed.
- For Reference, your generated code should be placed between "dhcp_domain_search" and "dhcp_router"
- This is a sample file DO NOT USE THIS IN YOUR ENVIRONMENT!!!! OS X Server app will generate most of this code for you, this example file is to show you the place where the generated code needs to be placed.
Other DHCP Configurations
Troubleshooting
Using DHCP or ProxyDHCP, you can capture the packets sent to and from a particular host using TCPDump.
Looking at the packets.
Using TCPDump to capture all traffic going into and out of an interface on Linux:
sudo tcpdump -w issue.pcap -i eth0
You might need to change the interface name in the above command if you're interface is named differently. This command will list all available interfaces; pick the right one (not the loop-back interface):
ip link show
Run the above tcpdump command on the FOG machine, then start the remote target host. Wait until the remote target host fails, then stop tcpdump using ctrl+c. Then transfer the PCAP file to your PC and examine it using Wireshark.
You may get the issue.pcap file by a number of means. The most basic way is by placing the pcap file inside of the /tftpboot directory (or saving it there) and then using TFTP to transfer the file to a Windows machine.
This would save the file to your /tftpboot directory, but you still need to specify the correct interface:
sudo tcpdump -w /tftpboot/issue.pcap -i eth0
Then on a windows machine, you would issue this command to retrieve the file via TFTP:
tftp –i x.x.x.x get issue.pcap
Obviously you need the TFTP windows component installed, and you should turn off your windows firewall.
Details about those things can be found here:
If your desktop computer that you want to get the file onto is Linux, then getting the capture file is much easier. You can simply use SCP like so from your desktop:
scp username@x.x.x.x:/tftpboot/issue.pcap /home/YourUserName/Documents/issue.pcap
After the capture is completed and you've opened the PCAP file with wireshark, please use the MAC address of the target host as the filter for sender & receiver. The below example filter basically does this: ( Show packet if Sending MAC equals xxxxxxx OR Receiving MAC equals xxxxxx )
Example Filter (change the MAC addresses):
eth.dst == 00:0C:CC:76:4E:07 || eth.src == 00:0C:CC:76:4E:07
Other usefull display filters are bootp (DHCP), tftp and http, for example:
bootp || tftp
Using the above method and filter, this is what a BROKEN Option 067 (or ProxyDHCP) conversation might look like:
In this case, DHCP (or dnsmasq) boot file name is not configured correctly, the boot file does not exist, or TFTP is not configured properly.
Common problems and fixes
My problem isn't in the WiKi!
If you have a problem with FOG, or have a solution to a problem with FOG, please visit the forums for help or to report your solution. We try to keep the WiKi updated with things found in the forum. You can visit the forum here: FOG Forums
Please enter tftp server:
Description
When trying to network boot to FOG, you are presented with a prompt similar to the below picture:
Solution
Typically this is caused by two or more DHCP services running on one network, and one or more of them being incorrectly configured for FOG. The administrator may or may not know of these DHCP services, one or more of them could be a rogue DHCP service. You can find a rogue DHCP service by running Wireshark on a computer and applying the filter bootp to only see DHCP traffic, and then doing several IP releases and renews. Any rogue DHCP service should show up in the replies.
Another cause of this problem, although less common, is that Option 066/next-server is not configured on the only DHCP server in the environment. Find instructions on correcting this here: Modifying existing DHCP server to work with FOG
Description
You see a rolling error that says:
Failed to load libcom32.c32
Failed to load COM32 file vesamenu.c32
And the host won't boot to the network.
Solution
This error has been seen in FOG Trunk (r3500s), and could possibly occur in 1.2.0 also.
This is caused by DHCP option 067 being set to pxelinux.0
Some people have large DHCP scopes set. Sometimes a higher-up global scope/setting can override local scope settings for a particular site.
Whatever the case, DHCP is indeed handing out pxelinux.0 and that's generally not advised.
For ProxyDHCP users (dnsmasq), you should look to see what boot file is being handed out.
For those that have inherited / upgraded a FOG server and are trying to use standard DHCP for 066 and 067, it's possible that ProxyDHCP might be running on your FOG server, and it's possible that ProxyDHCP is re-setting 067 on your network hosts to an incorrect value of pxelinux.0 which would cause this error.
You should use either undionly.kpxe or undionly.kkpxe for BIOS booting for option 067, or use any of the .efi files inside of /tftpboot for UEFI booting.
Please see this article for more details about the various boot files available in fog: Filename Information
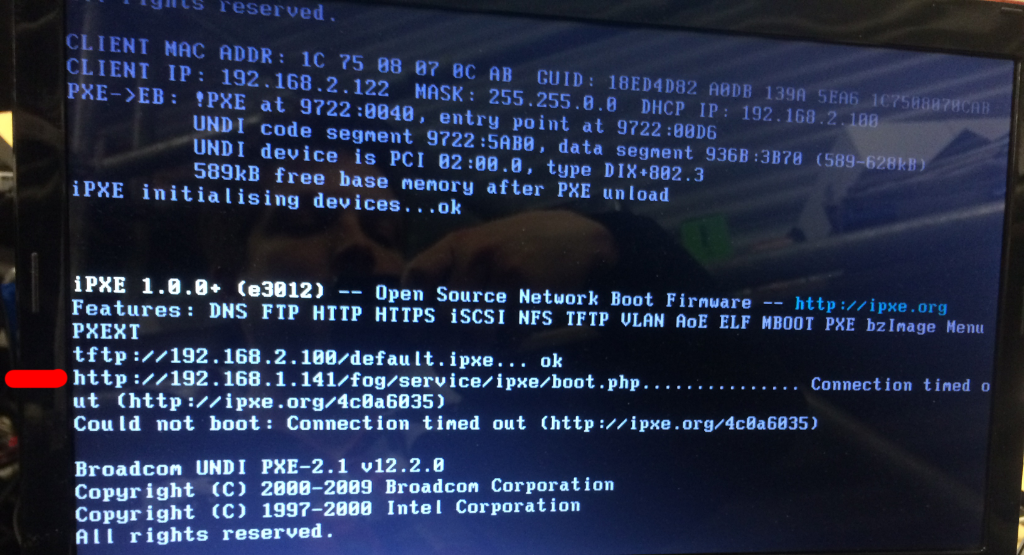
Could not boot: Connection timed out (http://ipxe.org/4c0a6035)
Description
You get a timeout error, either after installing or updating the FOG server, or after changing the FOG server's IP address.
The error is similar to the picture below:
Solution
Edit the file /tftpboot/default.ipxe (it's a text file)
Somewhere around the bottom of the file, you will see a line that looks like below, where x.x.x.x should be your FOG Server's current IP address. If the IP is wrong, fix it and save the file.
chain http://x.x.x.x/fog/service/ipxe/boot.php##params
Also edit the /opt/fog/.fogsettings file to make sure you have the correct IP address assigned in there, so that when you update in the future, this doesn't happen again.
Unable to connect to tftp server
For Versions Before 0.24
This seems to be caused by a password issue,
1. From the fog management interface, go to users.
2. Reset the fog user password.
3. Click the "I" icon - "Other Information"
4. Click "Fog Settings" in the menu on the left
5. Replace the FOG_TFTP_FTP_PASSWORD and the FOG_NFS_FTP_PASSWORD fields under FOG settings with
   your Linux fog user password. (Seems like FOG_NFS_FTP_PASSWORD is gone for ver .24).
For Versions .24-.32
- Reset the local password for user fog with: [sudo] passwd fog
- In management front end, go to Storage Management -> All Storage Nodes
- Click on DefaultMember
- Change the Management Password to match the password you just changed.
- Then go to Other Information and change FOG_TFTP_FTP_PASSWORD also.
- Go to your fog web location, on Red Hat and CentOS is in:
/var/www/html/fog/
Then open the file:
/commons/config.php
and check the values of: TFTP_FTP_PASSWORD and STORAGE_FTP_PASSWORD
These MUST match the password you set above, if not write them properly in here
Finally reload of the service
/etc/init.d/vsftpd reload
Verify Server Settings
If you have modified your server setup since first install, then the new changes must be updated and verified in the Fog Settings menu. It might not be enough to just re-run the installer. For instance, a new IP lease will cause the server to show the Unable to connect to tftp server error message.
- Go to the "I" icon, which is the About menu in 0.29
- Select Fog Settings and navigate down to TFTP Settings and verify that all options are correct for your setup.
Ensure nothing else on the network is conflicting with the DHCP server
I had this error the past two days and tried all of the standard suggestions. Finally Wireshark came to the rescue. I discovered a second, feral DHCP server on the network that wasn't issuing IP addresses but must have been running interference somehow. When I disconnected it from the network, PXE boot worked as expected.
