Managing FOG
Contents
- 1 Managing FOG
- 1.1 Dashboard
- 1.2 Hosts
- 1.3 Groups
- 1.4 Images
- 1.5 Storage Management
- 1.6 Users
- 1.7 Tasks
- 1.7.1 Overview
- 1.7.2 General Tasks
- 1.7.3 Advanced Tasks
- 1.7.3.1 Debug
- 1.7.3.2 Capture - Unicast (Debug)
- 1.7.3.3 Send - Unicast (Debug)
- 1.7.3.4 Send - Unicast (Without Snapins)
- 1.7.3.5 Deploy All Snapins
- 1.7.3.6 Deploy Single Snapin
- 1.7.3.7 Memory Test
- 1.7.3.8 Wake Up
- 1.7.3.9 Fast Wipe
- 1.7.3.10 Normal Wipe
- 1.7.3.11 Full Wipe
- 1.7.3.12 Disk Surface Test
- 1.7.3.13 File Recovery
- 1.7.3.14 Virus Scan
- 1.7.3.15 Hardware Inventory
- 1.7.4 Scheduling
- 1.8 Setting up Printers With Fog Printer Management
- 1.9 The FOG Client Service
- 1.10 Snap-ins
- 1.11 Client Side Tasks
- 1.12 Active Directory Integration
- 1.13 FOG Reports
- 1.14 Plugins
- 1.15 Other Settings
- 1.16 Mobile Management Interface
Managing FOG
Dashboard
Moved to https://docs.fogproject.org/en/latest/management/web/dashboard/
Hosts
Moved to https://docs.fogproject.org/en/latest/management/web/hosts/
Groups
Moved to https://docs.fogproject.org/en/latest/management/web/groups/
Images
Moved to https://docs.fogproject.org/en/latest/management/web/images
Storage Management
- The Storage Manager introduces the concept of Storage Groups. Basically, a storage group is a group of NFS servers that share images and share the load of computers being imaged. Any member of a storage group is referred to as a Storage Node. You may have as many storage groups as you wish and as many storage nodes within those groups as you wish. In each storage group, there is one storage node which is designated as the Master of that group. Basically, this Master node is the node where all image captures go, this node handles multicasting tasks for the group, and is the image replicator the for the group. This means that whatever images are stored on this node are what gets distributed to the entire group.
- What this new system of storage management gives us is a distributed model for FOG which allows for more unicast transfers at a single time. We also gain data redundancy. We also take stress off of the main FOG server.
- Below is a brief overview of Storage Groups
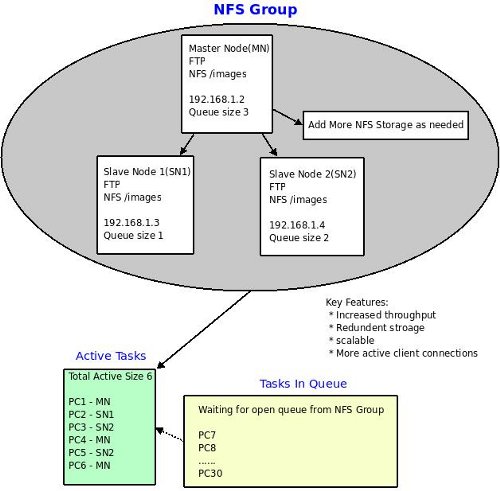

- This image shows a single Storage Group and the flow of data within the group. The queue size of the system is the sum of the queue size of all the storage nodes within the system. So if you have 4 nodes each with a queue size of 10, then the queue size of the system is 40, which means 40 clients can be imaged (unicast) at one time.
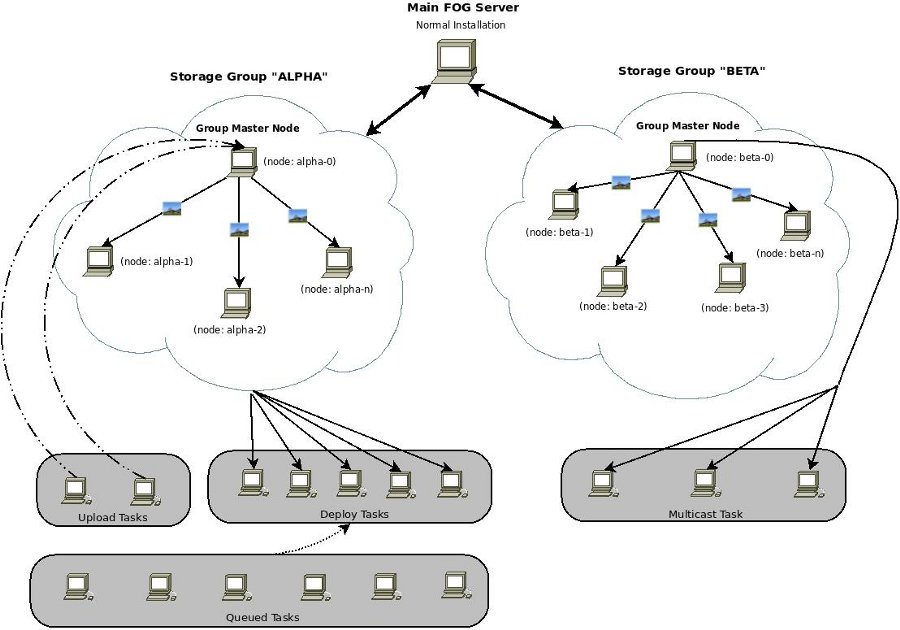

- This image shows that it is possible to have multiple storage groups on your network, which are isolated from each other. This image also demonstrates, that captures always go to the master node and multicast session always send data from the master node. Images are pushed out from the master node of the group to all other members of the group.
- Key Benefits
- Increased throughput
- Redundant Storage
- Scalability
- Also see Storage Nodes for tutorials.
Adding a Storage Node
- Definition: Storage Nodes provide extra NFS/FTP storage space which increases available throughput and redundancy within a network. They do not provide PXE, TFTP, or DHCP services at secondary sites. To enable additional PXE and TFTP services at secondary sites see this section: #Including multiple PXE / TFTP servers
- Video Tutorial: http://www.youtube.com/watch?v=X72WthDGwsw&fmt=18 (old video but still valid infomation)
- To add an additional storage node to the network, the computer should be prepared in the same way the main FOG server would be prepared (disable firewall, SELinux, etc). You can also safely mix operating systems for the nodes of you storage group, some nodes can be running fedora, and some can be running Ubuntu. It is important to update your storage nodes when you upgrade to a new version of FOG. Installation of a storage node is done with the same installer for a normal FOG server. Installation can be started by running the installer script, the steps are detailed below.
- Surprisingly enough some users have actually gotten a Windows Storage node to work properly. See Windows_Storage_Node for more information on this.
Installing the Node
- To Install a node:
- Run the installation script, ./installfog.sh
- Select your operating system.
- When prompted for Server Installation Mode, select S, for storage node.
- Enter the IP address of the storage node.
- Confirm you interface
- Then you will need to enter the IP address or host name of the node running the FOG database
- Then you will be prompted for a username (typically fogstorage)
- and a password that is located on the FOG server, that will allow the storage node to access the main FOG server's database. This information is located in the FOG management portal for convenience (on the main for server). It can be accessed via Other Information -> FOG settings -> section FOG Storage Nodes.
- You will then be prompted to confirm your installation settings, if they are correct press Y end hit Enter.
- When installation completes, the install will produce a username and password that will be needed to add the storage node to the FOG management portal. Username is "fog", password is in /opt/fog/.fogsettings
Adding the Node to the Management Portal
- To Add a Node
- Log into the FOG Management Portal
- Navigate to the Storage Management section.
- Click on Add Storage Nodes.
- For the Storage Node Name, enter any alpha numeric string to represent the storage node.
- Enter any description you wish
- Enter the IP address of the storage node you are adding. This must be the IP address of the node, DO NOT use a hostname here or the node will not function correctly.
- Enter the maximum number of unicast clients you would like this node to handle at one time. The value that we recommend is 10.
- Is Master Node is a very dangerous settings, but for right now leave it unchecked, for more details please see: #Master Node Status.
- Next, select the storage group you would like this member to be a part of, in our example we will pick Default
- Next, specify the image location on the storage node, typically /images/, your image location should always end with a /.
- Next, you will want to check the box, to enable the node.
- The last two fields take the username and password that are generated during the installation of the storage node. username is "fog", password is in /opt/fog/.fogsettings
- Then click Add to have the node join the storage group.
Monitoring The Master Node
- On all storage nodes there is a new service (as of version 0.24) called FOGImageReplicator which is a very basic script which, if the node is the master, copies all of its images to all other nodes in the storage group. The coping is done every ten minutes by default, which means your images are NOT instantly duplicated to all nodes.
- If you would like to view the status of the image replication, you can do so on the storage node by switching to tty3, by typing ctl + alt + f3. Output is also logged to a file in the /opt/fog/log directory.
- FOGImageReplicator logs are also located in
 Fog Configuration --> Log Viewer --> FILE: [Select Image Replicator]
Master Node Status
- The Master Node (could be the server or a particular node) in a storage group is the node that distributes images files to all other nodes in the storage group.
- If you have all your images distributed across 3 nodes in a storage group, if you add a new storage node that has no images stored on it, making that node master will cause it to take over and push it's image store of nothing to all other nodes, wiping out all of your images. So it is important to be very careful and backup your images when you change a node's master status.
- Notes - You can have many storage nodes in a storage group. You can have one master storage node in a storage group. You can not have more than one master storage node in a storage group. You must have one master storage node for replication to take place to other nodes in the group. If a master storage node is set, all captures first go to the master storage node of the storage group the image is assigned to; and are then replicated to other storage nodes.
Including multiple PXE / TFTP servers
- A traditional Master Storage Node, as described above only provides File Storage redundancy. While this can help increase multicast throughput on a single network, all the machines under FOG management must be within the same subnet/VLAN so that DHCP broadcast requests can be directed to the Main server. (see note below)
'''Note:''' depending on the network, it may be possible to configure [http://en.wikipedia.org/wiki/UDP_Helper_Address iphelper] to forward packets to the Main FOG server
- The following instructions are intended to help configure additional Storage Nodes to operate independently on separate networks, while still syncing with and taking commands from a single Main FOG server.
- Click here for instructions on setting up multiple PXE / TFTP servers
Users
Overview
- FOG has only two levels of users, regular users and mobile users. Regular users have access to the mobile portal and the full management portal. Mobile users have access to only the mobile management portal and Quick Image functions.
Creating Accounts
- All accounts are created under the "Users" section of the FOG portal. To create a new account click on the "New User" button on the left hand side of the page. All accounts must have a unique username, and a password. After filling in the required information click on the "Create User" button.
Modifying Users
- FOG accounts can be modified from within the users section. First you must locate the account you wish to modify by clicking on the "List all Users" button on the left hand side of the page. When a user is located, click on the edit button on the right hand side of the table.
Tasks
Overview
- Tasks are all the actions that you can take on a computer, and in FOG there a numerous tasks that can be done including:
- Deploy (Unicast)
- Capture (Unicast)
- Deploy - Multicast
- Debug
- Memory Test
- Test Disk
- Disk Surface Test
- Recover (File Recovery)
- Hardware Inventory
- Password Reset
- Deploy All Snapins
- Deploy Single Snapin
- Wake-Up
- Deploy - Debug (Unicast)
- Capture - Debug (Unicast)
- Deploy - Without Snapins (Unicast)
- Fast Wipe
- Normal Wipe
- Full Wipe
- Virus Scan
- Virus Scan - Quarantine
- Donate
- Torrent-Cast
In the tasks section of FOG you can perform tasks on single hosts or groups of hosts. This section also allows you to monitor selective tasks, and stop/cancel tasks.
General Tasks
The general/common Tasks in FOG include unicast image capture, and unicast image send, as well as a multicast image send. In FOG, sending an image to the server is considered an image capture, and deploying an image to the client is called a send. Both of these tasks can be started directly from the search, list all hosts, and list all groups pages.
To perform a simple image capture, click on the upward facing arrow next to the host. Captures are only possible on a host, not a group. Capturing an image will also overwrite any image file that may already exist for that host without any notification or confirmation.
Please note that capturing images of Windows Vista and Windows 7 requires special command to be run on the clients prior to image capture. Please see What do I have to do to an image before capturing? for more details.
For a video demonstration of an image capture, please see: http://www.youtube.com/watch?v=jPPZr0abVfg&fmt=18
To perform a simple image send, click on the downward facing arrow next to the host. An image send can be done on a host or a group. When sending an image to multiple computers FOG works in queue mode, which means that it will only send to 10 (by default) computers at one time. This is done to keep the server from being overworked. As soon as the a machine finishes, another from the queue joins.
To perform a multicast image send you must search for a group of hosts on the "Task Management" page. Multicast tasks can only be performed on a group of hosts. Multicast tasks will send to all the computers in the group at once, and the task will not start sending until all members of the group have connected with the server. After starting a multicast task, status can be view by clicking on [ctl]+[alt]+f2. A log is also kept for multicast transfers which is stored at /opt/fog/log.
Advanced Tasks
The advanced Tasks in FOG include everything that is not a simple capture, simple deploy or mutlicast deploy.
Debug
Debug mode boots the linux image to a bash prompt and allows the user to issue all commands by hand.
Capture - Unicast (Debug)
Does the same thing that debug mode does, with the exception that the environment is setup to capture the image. To start the imaging process just type:
fog
Send - Unicast (Debug)
Does the same thing that debug mode does, with the exception that the environment is setup to send the image. To start the imaging process just type:
fog
Send - Unicast (Without Snapins)
This task does a normal send task with the exception that if any snapins are associated with the host, they are not deployed to the host.
Deploy All Snapins
This task will send all the snapins associated with a host to the host without imaging it.
Deploy Single Snapin
This task will send a single snapin that is associated with the host to the host without imaging it. (Note: The snapin must be associated with the host already)
Memory Test
Boots to Memtest86, a memory testing tool. This a task will not exit with out user intervention at the client side. The task must also be manually stopped via the management front end.
Wake Up
Wakes up host or group of hosts using Wake-on-Lan.
Fast Wipe
This task does a quick and dirty wipe of the drive. This task writes zeros to the first ~40MB of the disk. This task should NOT be used if you don't want your data to be recoverable.
Normal Wipe
This tasks writes random data to the entire surface area of the disk.
Full Wipe
This tasks writes random data, multiple times to the entire surface of the disk.
Disk Surface Test
This task will look for bad blocks on the hard disk and report them back to the client console.
File Recovery
This task will load an application that can be used to recover lost files from the hard disk.
Virus Scan
This task will update and load ClamAV and scan the partition for viruses. It will either scan and report or scan and quarantine files, it will also report back to the management portal with the results of the scan.
Hardware Inventory
The hardware inventory task will execute the same task as the fog.reginput client side task. Since the host is already registered, all it will do is update the computers inventory and restart. It is visioned that this task could be run on a regular interval on a group of all computers in your network, or some sub group of computers in your network. Then on the next reboot of those computers an inventory would be performed.
Scheduling
As of version 0.27 of FOG, select tasks can be scheduled using a static date/time combination or using a cron style repetitive task scheduling. Task scheduling can be performed on either single hosts, or on groups of computers. One thing to note about task scheduling that isn't intuitive is that it requires an image to be associated with the host, even for non-image based tasks! The reason for this is because tasks are only run on the master storage node associated with that host, and the only way to tie a storage node to a host is via an image. We did this to prevent multiple storage nodes to try running the same task for a specific host.
Single Execution Scheduling
Single task execution will run a task at a single date and time, then the task will be discarded. To scheduled a single execution task, you would go to the tasks section of fog, then select the host or group you would like to schedule the task, then select the task you would like to schedule. You will then be presented with the screen show below.

To schedule a single execution task, click on white text box below "Schedule Single Task Execution?" and a pop up calendar will load and allow you to select your date and time for the task. Click on the date to close the calendar, then start you task.
Cron Style Task Scheduling
Cron style task execution allows you to do complex repetitive task scheduling. After a cron task executes, it is not removed, as single executions tasks are. Cron style tasks, as the name suggests are similar to the Linux cron task scheduler format. Cron style tasks are created as single execution tasks are, except when presented with scheduling options, select the option "Schedule Cron Style Task Execution". Below that check box are a series of text boxes including:
min    -> Minute [00-59]
hour   -> Hour [00-23]
dom    -> Day of Month [01-31]
month  -> Month [01-12]
dow    -> Day of Week [01-07] (Sunday ==> 0, Saturday ==> 6)
To give an example of how this works, if you wanted a capture task to run at 10:00pm everyday you would enter the following:
0 22 * * *
This basically says run the task a 0 minutes into the hour, on the 22nd hour (10:00pm), on every day of the month, on every month of the year, on every day of the week.
To take this example further, lets say you only wanted to capture the image every other day, we could do this by adding:
0 22 */2 * *
The */2 now tells the scheduler to only run on even days of the month.
We could even ask the scheduler to only do a backup on even weekdays by adding:
0 22 */2 * 1-5
The 1-5 we just added says only run on days 1 through 5, which relate to Monday - Friday.
Now we will ask the scheduler to only backup in the month of February.
0 22 */2 2 1-5
Another basic example could be if you wanted to run an inventory update on the first of every month you could use:
30 1 1 * *
This task would then run at 1:30 on the 1st of every month.
The FOG scheduler doesn't support 100% of the operations that cron supports, below are the operations that are supported:
4       -       Listing a static number
4,5,6,7 -       Listing a group of numbers
4-7     -       ranges of numbers
4-7,10  -       ranges and lists
*/5     -       * divided by a number
*       -       Wildcard
For more information on cron please see http://en.wikipedia.org/wiki/Cron
Setting up Printers With Fog Printer Management
FOG Version
Relates to FOG Version 0.12 or higher.
Known Issues
Setting of the default printer will only work if the fog tray icon is running.
Overview
The printers section of FOG allows you to create printer definitions that you can later associate with hosts. The FOG service looks at these associations and during service it will attempt to install any printers listed. This service has three settings which define how the printers are managed, printer management can be set to:
- No Printer Management
- Add Only
- Add and Remove
All hosts default to No Printer Management which means that the FOG service does nothing to the hosts printers. Add Only does as the name implies, and will only add printers to the host machine, it will not remove any existing printers that may be installed. Add and Remove will take full control of the hosts printing system and only allow for the printers that are specified by the FOG management console to exist on the host.
Adding New Printers
In order for the printer to be added to the host computer, the printer drivers must be stored in a public area, or included on the host computer. This public area can be a Novell Network share where public has read-only access, a Windows share that is public read-only to everyone, or a Samba share (possibly residing on the FOG server) that is public read-only to everyone. This share must be accessible via a UNC path as the service may attempt to install the printers before drive mapping occurs. In this share the printer drives and .inf file must exist. FOG supports install IP based (Jet-Direct) printers, public access NDS printers, Local printers, windows share based printers, (and we think, but could use a confirmation as it hasn't been tested) AD based printers.
If you wish to see what printers are included with Windows XP, navigate to c:\windows\inf\ntprint.inf. Open this file with a text editor and you will be able to install all the printers listed using the ntprint.inf file.
To create a new printer definition click on the Printer icon on the system menu bar. Then on the left hand menu, click on Add New Printer. The form you are presented with will require you to enter:
- Printer Model - This must match the name in the INF file.
- Printer Alias - This can be anything you wish and it is what the end user will see.
- Printer Port - This is something like LPT1:, or IP_1.1.1.2.
- Printer INF File - This is the path to the INF file for the printer driver.
- Printer IP - (optional) This is ip address of an IP based printers only, this can take the form of 1.2.3.4:9100 or 1.2.4.5. If the port doesn't exist already, it will create one named IP_x.x.x.x, where x.x.x.x is the ip address. That is what should be entered in the port field.
After all the required information is entered, click on the Add Printer button.
Linking Printers to Hosts
Linking printers to hosts can be done from either the hosts section or the groups section. In the hosts section find the host you would like to add a printer to, click on the edit button associated with that host. In the host menu, click on the Printers button. First select how you would like the host to be managemed, either No Printer Management, Add Only, or Add and Remove. Then in the section below, select the printer you would like to install from the drop down list and click on the Update button.
Creating a Samba Based Printer Store on FOG
If you do not have a public sever where you can store your printer drivers for the FOG Printer Manager, then it is very easy to set one up on the FOG server using Samba, so all your Windows Clients will be able to connect.
Creating a Samba Based Printer Store on FOG
The FOG Client Service
Note: Most of the things here about the FOG Client service apply to the legacy FOG client that came with FOG versions 1.2.0 and older. FOG 1.3.0 now comes with a new FOG Client. Details on this can be found here: FOG Client
Overview
The FOG Client Service is a Windows Service that is intended to be installed on the client computers during the image creation process. The FOG service communicates with the FOG server to provide certain service to the client computers including:
- Auto Log Off (0.16)
- Hostname Changes
- Active Directory Integration
- Directory Cleaner (0.16)
- Display Manager (0.16)
- Green FOG (0.16)
- Host registration
- Task Restarting
- Snapin Installation
- User Tracker
- Printer Manager
- User Cleanup (0.16)
- Client Updater
- User Tracker
Module specific configuration settings
The FOG Client Service is very modular in nature, which means you can install portions of the services provided, and leave off others. This also means that it is very easy to create new sub services if you know a little C#. All configuration data is held in a local INI file. Which is typically stored in
c:\program files\fog\etc\config.ini
This file holds, in the general section:
- FOG Server IP address
- FOG Service installation root
- FOG Service working directory
- FOG Log file path
- Flag indicating if GUI messages should be displayed
- The max log file size
Installation
The FOG service should be installed on the computer to be imaged before capturing the image to the FOG Server.
The FOG service is located in the FOG Service/bin directory or if the FOG server is already installed it can be downloaded from:
http://[serverip]/fog/client/
Double-click on the setup.exe to start the installation wizard. At the end of the wizard you will need to enter the IP address or hostname of your FOG server.

Then restart the computer, if you don't restart the computer you will have issues with the service GUI appearing correctly.
Quiet Installation
As of version 0.29 and higher, the FOG client now supports a quiet installation mode. This can help automate deployments, by allowing the command to be run without user interaction from batch files. To do this the setup.exe file must be run from the command line with the arguments fog-defaults=true /qb.
So the full command would be:
setup.exe fog-defaults=true /qb
Functions and Operation
Auto Log Out
Added in Version 0.16
This module of the FOG Service will log a user off of a client pc after X minutes of inactivity. This module will display a screen saver-like GUI after 3/4 of the inactive time is up. So if the time out value is 40 minutes, the GUI will be displayed at 30 minutes of inactivity. When the time is up, the client computer will reboot. This service module can be configured via the management portal via:
FOG Service Configuration -> Auto Log Out
To enable the module globally, place a check in the box next to Auto Log Out Enabled?. The time to auto log off can changed globally via Default log out time: The minimum recommended value for this setting is 4 minutes.
The background image for the auto log off module can be modified via:
Other Information -> FOG Settings
The settings can be changed by modifying the value for FOG_SERVICE_AUTOLOGOFF_BGIMAGE. This settings will accept a jpg file that is local to the client computer like:
c:\images\image.jpg
This setting will also accept files located on a web server such as:
http://www.somedomain.com/image.jpg
Provided with FOG is a simple php script that will display a random images that is located on the FOG server. To use this option set FOG_SERVICE_AUTOLOGOFF_BGIMAGE to
http://x.x.x.x/fog/public/randomimage.php
Then simply put the images you would like to use in the following directory on the fog server:
/var/www/html/fog/public/imagepool
Images used for the auto log off module must be in jpg format, and must be 300px by 300px.
Hostname Changer
This module of the FOG Service is used to change the hostname of the client computer and to allow the client to (optionally) join a Active Directory Domain after imaging. This process only runs shortly after service startup, which means typically only when you start your computer. The service communicates with the FOG server over port 80 and determines the hostname that is present in the FOG database for the host. The hosts are matched to the FOG database by their MAC addresses. If the hostnames are found to be different, the client changes the computers hostname and restart the computer.
The config.ini file contains configuration options for this module.
netdompath=
Allows you to set the path to the netdom.exe file. In some cases the file does not exist on the system. It can be downloaded from: Microsoft Download Center
Host Register
As of version 0.29, this module will only add additional mac address to a host that is already registered, and add them to the pending mac address table, where they need to be approved in the FOG UI.
Task Reboot
This module periodically checks in with the FOG server to see if the client has an imaging task assigned to it. If a task is found AND no one is logged into the workstation, then the client will restart and join the task.
The config.ini file contains configuration options for this module. As of version 0.13 of FOG you can change:
forcerestart=0
to
forcerestart=1
This will make the computer restart if a task is found, regardless of whether a user is logged into the computer.
You can change how often the service will check in with the server by changing:
checkintime=xxx
where xxx is the number of seconds the service will wait between check-ins.
Directory Cleaner
Added in version 0.16
This module will clean out (delete) the contents of a directory on user log off. This useful when you don't want any settings cached between users. This module will only delete the contents of a directory and not the root directory itself, so if you specify c:\trash, the service will remove all files and folders located within c:\trash but leave the folder c:\trash.
Display Manager
Added in version 0.16
This module is used to restore screen resolution between clients. This will restore a fixed resolution and refresh rate when a user logs into a computer.
Green FOG
Added in version 0.16
This module will simply shutdown/restart the client computer at a fixed schedule if no user is logged in. The schedule can be defined via the management portal.
Snapin Client
This module periodically checks in with the FOG server to see is the client has an snapin set to be deployed to it. If a snapin is found AND no imaging task is associated with the client, then the client will download the snapin and install it in the background.
The configuration file contains settings for this module including:
checkintime=xxx
where xxx is the number of seconds the service will wait between check-ins. It is important to note that currently the fog client will wait 5 minutes when first connected / established before it starts checking and installing any snapins from the server.
User Tracker
This module attempts to track user access to the host computer by the Windows user name. It attempts to track logins and logoffs as well as well as the state of the computer at service startup. The service will even attempt to track users when they are not on the network by writing all entries to a journal file, then replying the journal the next time the client is on the network.
There are no configuration settings for this module.
User Cleanup
This module will remove all users not white listed in management portal on log off. This module is useful when using services like dynamic local user. All entries in the management white list are treated as prefixes to usernames, which means that they will white list all users that start with whatever was entered in the management front end. For example, if you enter admin in the management white list, then users admin, and administrator will NOT be removed from the computer.
Printer Manager
This module checks on service startup to see what printers should be installed/removed from the client PC.
There are no configuration settings for this module.
Client Updater
This module waits (randomly) between 60 and 500 seconds after service startup to check the local fog server for client updates, and if any are found the service will download and install them. Updates will NOT take effect until after the service is restarted.
There are no configuration settings for this module.
Keeping Clients up to date
Overview
As of version 0.12 of FOG, we have included a client updater module. This module is no different from any of the other sub service modules. This service waits anywhere between 60 and 500 seconds after the FOG service starts up, and then attempts to check with the server for newer FOG service modules. If new modules are found the client will download them, and they will be active on the NEXT service startup. These modules are controlled from the FOG Management Console.
Only certain modules can be updated, only those that are a sub class of AbstractFOGService. This means you should NEVER attempt to update the FOGService executable (FOGService.exe file), or the AbstractFOGService.dll file. It is recommended that you not update the ClientUpdater.dll, because if the ClientUpdater.dll file becomes corrupt or not functional, your clients will not be able to update from that point on. Below are a list of the .dll files that can be updated.
- UserTracker.dll
- TaskReboot.dll
- SnapinClient.dll
- PrinterManager.dll
- HostRegister.dll
- HostnameChange.dll
- GUIWatcher.dll
- ClientUpdater.dll
- config.ini
Care must also be taken when updating the config.ini file, if the IP address is incorrect or the syntax of the file is incorrect, it could leave the FOG service crippled on the client computers.
Posting Updates
To add new modules that can be pushed down to clients, first install a client with the new service or new module and confirm that it works as you would like. Log into the FOG management console, then go to the Infomation/Misc section (the little "i" icon). Click on Client Updater on the left-hand menu. Now click on the browse button to select the module (.dll) file you would like to post, then click on the capture button. After capturing the file should appear in the table above. If you are adding a new module, you will probably want to capture a new config.ini file to include new configuration settings required by that new module.
FOG Tray
The FOG Tray is a Windows application that runs on user login that docks in the system tray. The FOG Tray, like the FOG service, is very modular in nature. New modules can be dropped in the FOG tray directory and on next load they will be loaded. This tray icon has the ability to communicate with the FOG service, this allows FOG more interactivity with the end-user.
What happens is that when the FOG service's printer manager module gets a request to set a default printer, the service attempts to contact the FOG Tray. If communication is established, then the service will ask the tray to set the default printer. On the other hand the end user can right click on the "F" icon in the system tray, then select printers, then update my printers. What this will do is attempt to send a request from the FOG Tray to the FOG Service and have the service check for printer updates (new printers or printers to be removed). If one is found the service will install any new printers assigned in the FOG Management portal.
This application is in its very early stages and currently doesn't have a lot of functionality. It is currently only used to allow end users to update their printers and to allow the setting of default printers (from the FOG service). Our vision for the FOG Tray is to add modules that would allow users to install printers that are published as public (via the management portal) without the printer being directly assigned to their host. We would also like to do the same thing for snapins where some of your snapins could be defined as public where anyone could install them on their computer.
Troubleshooting
If you have problems with the FOG Service, please refer to the log file that is located at:
c:\fog.log
If the PXE boot does not work
If booting from the fog server through pxe comes up with an error file not found, edit /etc/default/tftpd-hpa
Change TFTP_DIRECTORY to
TFTP_DIRECTORY="/tftpboot" Then
/etc/init.d/tftpd-hpa restart
Snap-ins
Overview
- The FOG Service has the ability to install snapins to the clients. Snapins can be anything from whole applications like Microsoft Office to registry keys or desktop icons. Snapins can even be used to uninstall applications or remove unwanted files. For the end use's point of view, they will not even noticed that a snapin is being installed until it is complete. At this point a message will notify them that a new application has been installed on their computer. Snapins can be in MSI (0.17) or EXE formats, and can be created with any snapin creation tool like InstallRite or already packaged MSI files (0.17). You can also push commands to the computer that include .vbs scripts / .cmd (commands) and .bat (batch scripts).
- Snapin return codes are specified by the program that's being installed.
Creating a Snapin / Overview
FOG doesn't provide a tool to create snapins, but instead allows you to push files and execute them on the remote computers. It is highly recommended that you push the actual installer to the computer instead of using a program such as InstallRite.
If you have never silently installed software to a computer, or created an answer file for a program please look at the website Appdeploy Link This website has an trove of information on how to push software to a computer remotely.
Creating a Snapin for larger applications with SFX Maker
Some larger applications such as Microsoft Office and Adobe Products (Acrobat / Creative Suite) require multiple files to install properly. If you have an application that is not a single .exe please use SFX Maker. This tool is free for non commercial use, and most programs fall under the GPL. SFX Maker's Website
For instructions on how to use this software please see the youtube videos below.
Office 2003 Install Office 2007 Install
SFX Maker takes an entire folder and encapsulates it or "folds" it into a single .exe which then "unfolds" to its original state and launches a file or command.
Creating a Snapin with InstallRite
If for some reason you do wish to use Installrite please be aware it comes with issues and limitations (not compatible on all windows operating systems / can cause issues with the computer it is pushed to). Below is an example of how to build a package with that software
In this example we will use Epsilon Squared's InstallRite which can be downloaded from http://www.epsilonsquared.com/installrite.htm. This application will package up your snapin as an exe file which will be uploaded to the FOG server.
- To run InstallRite navigate to c:\program files\Epsilon Squared\InstallRite\InstallRite.exe
- Click on "Install new software and create an InstallKit"
- On the Configure screen, click Next.
- On the Snapshot screen click next to create a new system snapshot.
- On the next screen,click the browse button to select the application you wish to install, then click next.
- When installation is complete InstallRite will come into focus, click the next button. InstallRite will scan your system again.
- Enter a name for your snapin.
- Click "Build Install Kit"
- Select "Quiet Installation Mode", Never reboot, even if needed, and "Never prompt the user and only overwrite older files"
- Click OK and it will build your snapin.
Preparing the FOG Server
If your snapin is larger than 2MB you will need to make two changes to the FOG server to allow uploads of larger than 2MB.
See also: Troubleshoot Web Interface
Fedora
- On the FOG Server click on Applications -> Accessories -> Text Editor.
- Select Open and navigate to "/etc/php.ini"
- Change UPLOAD_MAX_FILESIZE to 1900MB (On a 32Bit OS don't set this value above 2GB)
- Change POST_MAX_SIZE to the same value.
- Save and close the text editor.
- Click on Applications ->System Tools -> Terminal and type "service httpd restart"
Ubuntu
- sudo gedit /etc/php5/apache2/php.ini
- Change
- memory_limit = 1900M
- post_max_size=1900M
- upload_max_filesize=1900M
- Save Changes
- sudo /etc/init.d/apache2 restart
VMWare
- sudo vim /etc/php5/apache2/php.ini
- Edit the following lines in the document (read below for assistance with working in VIM)
- memory_limit = 1900M
- post_max_size=1900M
- upload_max_filesize=1900M
- To edit content in vim you will need to press the "I" key on your keyboard to enter input mode.
- Hitting the Escape key will bring you out of input mode.
- Once out of input mode type :w and then enter to save the file
- Restart FOG once the file has been saved
Uploading the Snapin
- In the FOG Management Portal click on the Snapin Icon (Puzzle Pieces).
- On the left-hand menu click on the New Snapin Button.
- Enter a Snapin Name and Description.
- Browse to the snapin file you wish to upload.
- If you want the computer to restart after the snapin is installed click on the "Reboot after install"
- Click "Add"
As of version 0.17, fog supports using typical msi files as snapin files.
If the snapin file is a msi file you must perform these additional steps:
- Set Snapin Run With: to the path of msiexec.exe (ie: c:\windows\system32\msiexec.exe)
- Set Snapin Run With Arguments: to /i
- Set Snapin Arguments: to /qn
If the snapin file is a .vb script you must perform these additional steps:
- Set Snapin Run With: to the path of cscript.exe (ie: c:\windows\system32\cscript.exe)
Documentation on list of support snapin's and command line arguments [[1]] There are MANY more supported applications that can be installed via command line arguments. You might have better luck installing them directly via .EXE / .MSI / or scripting them via .VBS . For more info on this consult the forums --Ssx4life 09:04, 8 October 2009 (MST)
Linking the Snapin to Hosts
In order for a snapin to be deployed it must be linked with a host. To do this perform the following:
- In the FOG Management Portal, click on the Hosts Icon.
- Search for and select a host and click on the edit button.
- Scroll down to the snapin section.
- Select the snapin you just created from the drop-down box and click the "Add Snapin" button.
The next time you image the computer the FOG Service will attempt to install that snapin. If you have problems, please see the fog log file located at c:\fog.log on the client PC.
Client Side Tasks
FOG Version
Applies to version 0.12 or higher.
Overview
FOG attempts to keep management centralized, but in an attempt to make deploying machines as easy as possible FOG has added a few basic client side tasks. These tasks can be run from the client computer during the PXE boot process. When the client boots and the FOG banner is displayed the pxe client will display a prompt like boot: or something similar. At this point you have 3 seconds to start typing one of the following commands.
- fog.memtest
- fog.reg
- fog.reginput
fog.memtest
This command will run the memtest86+ on the client computer.
fog.reg
This command will run the basic host registration and inventory process without any user input. It will register any new/unregistered hosts with the FOG server and pull a basic hardware inventory from them. The hostname of the computer will be the same as the MAC address without the ":".
If a host is already registered, then only an inventory will be performed.
fog.reginput
This command will run the full host registration process with user input, inventory and give the option to push down an image, all at the same time. During this process the user registering the host will be prompted for the computer host name, ip address, operating system ID, image ID, Primary User of the computer, asset tag 1, and asset tag 2.
If a valid hostname, os id, and image id are given and the option is selected to image the workstation after registration, the host will reboot and an imaging send will began.
If a host is already registered, then only an inventory will be performed, this prevents end-users from re-registering a machine with a different hostname, etc.
This tasks was designed for institutions that may get shipments of hundreds of computers that need to be deployed very quickly. They can be unboxed, inventoried, imported into FOG and imaged very quickly.
Operating System ID
As of Version 0.17 of fog, you can now enter ? at the Operating System ID prompt to get a listing of the valid operating system id values.
The following are valid values for operating system IDs:
- 1 - Windows 2000 / Windows XP
- 2 - Windows Vista
- 3 - Windows 98
- 4 - Windows (Other)
- 5 - Windows 7
- 50 - Linux
- 99 - Other
Image ID
Image IDs can be found in the management console, in the Images section. Search for the image, and click on the edit button associated with the image, the image id will be in the Address/url bar in the format of &imageid=xx.
As of version 0.17, you can enter ? at the Image ID prompt to get a listing of all your images and their ID numbers.
Active Directory Integration
Setup
Overview
FOG has the ability to register a host with Active Directory, in a limited sense. Versions of FOG up to and including 0.28 rely on the netdom.exe executable that is provided as part the support tools on the Windows installation media. In order for Active Directory integration to function, your image will need to have the FOG service installed, along with the Windows Support Tools.
Versions of FOG from (and including) 0.29 have this functionality built in and do NOT require netdom.exe or the support tools to be installed.
It is also very important that before capturing your image that the computer is NOT a member of any domain.
Security
Note: The below statement applies to older FOG versions (1.2.0 and below). When using FOG 1.3.0 and above in conjunction with the NEW fog client, this step is not needed. See here for more information.
Important - Please read!
In order to add a computer to a domain, FOG requires a username and password of an account that has rights to the OU where the computer objects are stored in the domain tree. This user account should have rights to join computers to the Domain, as well as sufficient rights to create/manage computer objects. FOG attempts to keep your password secure by encrypting it, but since FOG is open source, it is possible for someone to decrypt your password if you don't change the FOG "Passkey." It is highly recommended that you change this Passkey before implementing the AD integration in a production environment. Changing the Passkey requires you to recompile the FOG Service's Hostname change module, but don't panic this isn't hard and only need to be done one time. Please see the documentation below.
Preparing the Image
Before capturing an image to FOG that you would like to use with Active Directory, please ensure that the image:
- is NOT a member of the domain, change the computer membership to workgroup instead.
- has support tools installed (Not required for FOG versions from 0.29).
- has the FOG service installed.
FOG Setup
To setup a host to use AD, navigate to the hosts section of the FOG management portal.
- Search for, and select a host.
- Click on the Edit button
- Scroll down to the Active Directory section.
- Check the box next to Join Domain after image task
- Enter the domain NETBIOS name (i.e. MYDOMAIN, not mydomain.com).
- Enter the Organizational Unit where you would like to have the computer stored in AD. Leave if blank for the default. (Must be in LDAP format).
- Enter the user name that has access to the computer objects. Do not include the domain name if you are running version 1.2 (your mileage may vary with earlier versions). Development version of FOG will accept a name with or without domain (username OR mydomain/username).
- Enter the encrypted password. This password must be encrypted with the FOGCrypt utility. This utility is located in the FOGCrypt folder of the FOG download package. It is a Windows (.NET) command line application.
- Click Update.
The next time you image that computer the service will attempt to register the host with the domain information provided. If you have problems please refer to the FOG Service log file located in c:\fog.log
Making AD Integration Easier
As of version 0.20 of FOG, we have made it a bit easier to manage AD settings in FOG, by allowing for default settings for AD. This will allow the easy population of the domain, OU, username, and password. To set this feature up perform the following:
- Go to Other Information -> FOG Settings
- Set your default values for the following:
- FOG_AD_DEFAULT_DOMAINNAME
- FOG_AD_DEFAULT_OU
- FOG_AD_DEFAULT_USER
- FOG_AD_DEFAULT_PASSWORD (MUST BE ENCRYPTED!)
To test everything out, go to a host that doesn't have anything setup for AD, and click on the edit button for that host. Go to the host menu, and select Active Directory. Click on the Join Domain after image task: button and all your default values should be populated.
Securing Active Directory Integration
Overview
In order to add a computer to a domain, FOG requires a username and password that has rights to the OU where the computer objects are stored in the domain tree. FOG attempts to keep your password secure by encrypting it, but since FOG is open source and the methods used to encrypt the password are open for all to see, it is possible for someone to decrypt your password if you don't change the FOG "Passkey." It is highly recommended that you change this Passkey before implementing the AD integration in a production environment. Changing the Passkey requires you to recompile the FOG Service's Hostname change module, but don't panic this isn't hard and it only needs to be done one time.
The Development Environment
The hostname change module is written in c#, so in order to recompile it you will need to download Microsoft's Visual Studio Express Edition for C#. This can be downloaded from:
http://www.microsoft.com/express/vcsharp/
Install Visual Studio with the standard options.
Getting the Source
After Visual Studio Express is installed now we need to get the source code for the hostname change module. This is part of FOG download/installation package. This package can be downloaded from:
http://sourceforge.net/project/showfiles.php?group_id=201099
Extract this package, then navigate to "FOG Service\src\FOG_HostNameChanger\"
Double-click on HostNameChange.sln to open the project.
If you are asked to convert the project to the latest version, click the Finish button.
If you are using Visual Studion 2010, you need to change the target .NET framework to .NET 2.0. Do this by going to Project > hostnamechanger properties. On the Application tab, change the Target Framework to .NET 2.0
Once the project has opened, on the right-hand panel, in the "Solution Explorer", double-click on MOD_HostNameChanger.cs.
After do so, you should get the source code to display in the main panel, scroll down to the line:
private const String PASSKEY = "FOG-OpenSource-Imaging";
Change FOG-OpenSource-Imaging to anything you like, just remember what you change it to, as you will need it later.
Then click File -> Save All.
Then click Build -> Build Solution.
This will recompile the hostname change module with your unique key.
Now navigate to "FOG Service\src\FOG_HostNameChanger\bin\Release"
Copy only the file HostnameChange.dll to "FOG Service\src\FOG Service\bin\Release" (overwrite existing file).
Navigate to "FOG Service\src\FOG Service\"
Open the solution by double-clicking "FogService.sln"
If you are asked to convert the project to the latest version, click the Finish button.
If you are using Visual Studion 2010, you need to change the target .NET framework to .NET 2.0. Do this by going to Project > FOGService properties. On the Application tab, change the Target Framework to .NET 2.0
Change the build configuration from debug to release
Right click on "FOG Service Install" and click "Build"
Navigate to "FOG Service\src\FOG Service Installer\Release"
Select the 2 files, right-click -> Send To -> Compressed Folder
Copy the .zip file to your FOG Server "/var/www/html/fog/client". Overwrite the existing file.
Encrypting Your Password
Now that we have changed the passkey, we need you update the FOGCrypt ini file to use this new passkey.
Navigate to the FOGCrypt\etc directory from the FOG download package.
Open the config.ini file and change the passkey value to your new passkey, then save the file.
Now open a command window and navigate using the cd command to the FOGCrypt directory.
Type:
FOGCrypt [password]
Where [password] is the AD user's password that has rights to the Computers section of the AD tree.
The output from this command is what you will enter in the FOG management portal.
FOG Reports
FOG Version
Relates to FOG Version 0.12 or higher.
Overview
FOG Reports allow you to export data from FOG in two major formats including CSV, and PDF.
- Snapin Log - This report will report on snapin installation history.
- Imaging Log - This report will report on images deployed to hosts.
- Virus History - This report lists any viruses that were found on locate computers.
- Inventory - This report will report on the inventory information collect for network clients.
- Equipment Loan - This report can be used for equipment loaned to staff members.
- User Login History - This report contains information about user logins.
Running Reports
Running a report can be done from the Reports section of FOG, then by picking a report from the left-hand menu.
Importing User Created Reports
The reporting section of FOG allows for the end user to create and upload custom reports into FOG. A FOG report is a simple php script that is processed by the server. To import a report simply click on the Upload a Report button in the reports section, select the report then click on the upload button. The report will then show up on the left-hand menu.
Please be cautious when uploading reports from an unknown source as the writer of the report has full access to the FOG system and database! Make sure your sources are trustworthy before importing a report!
Creating Custom Report
Custom reports are simple php scripts in FOG. Custom reports can be created based on the following template:
Plugins
- Plugins give FOG extra functionality wanted for some users but not all.
Other Settings
Boot Image Key Map
FOG Client Kernel
Overview
In FOG, there aren't really drivers you need to find and download for your clients to work, this is because we ship a Linux kernel that has the majority of hardware device built into it. What this means is if you have a device that doesn't work with FOG you need to either build a new kernel yourself or try a newer kernel that has been released via our kernel updater.
Kernel Types
We currently build two "lines" of kernels, one called KS or KitchenSink. This kernel tries to include drivers for as many devices as possible, sometimes as the cost of performance, and this is the kernel that we ship with FOG by default. The other "line" is the PS kernel or the Peter Sykes kernel, which is a based on a config submitted by a user. This kernel line tries to be faster, but may not include as many drivers as the KS kernel.
Updating the Kernel
It is possible to update your client kernel from within the UI of FOG. To do this perform the following steps:
- Log into the FOG Management UI.
- Go to Other Information
- Select Kernel Updates
- Select the Kernel you would like to download, typically the newest kernels are on the top of the list.
- Click the download icon
- Select a file name for your kernel, to make it the default kernel leave the name as bzImage
- Click the Next Button
Mobile Management Interface
Overview
The FOG Mobile web interface is a very basic, stripped down interface for FOG. It is designed to be given to lower level technicians using low powered, mobile devices such as iPod touches, iPhone, PDAs, and internet tablets. The idea behind this interface is to make it easy for techs to re-image a computer while making the rounds at a site.
Using the mobile Interface
The mobile interface can be access via:
The portal requires a valid user name in password, which can be created via the FOG portal.

Once logged into the portal, users can search for hosts and image them, and view/cancel active tasks.


They can not change image associations, nor modify any properties of a host.