Difference between revisions of "BIOS and UEFI Co-Existence"
(→Step 3) |
m (→Using Linux DHCP: left brace missing) |
||
| (5 intermediate revisions by one other user not shown) | |||
| Line 40: | Line 40: | ||
filename "ipxe32.efi"; | filename "ipxe32.efi"; | ||
} | } | ||
| − | else | + | else { |
# default to EFI 64 bit | # default to EFI 64 bit | ||
filename "ipxe.efi"; | filename "ipxe.efi"; | ||
| Line 225: | Line 225: | ||
= Using Windows Server 2012 (R1 and later) DHCP Policy = | = Using Windows Server 2012 (R1 and later) DHCP Policy = | ||
| − | The below method assumes that your normal Scope options 066 and 067 are already setup for BIOS based network booting. The below DHCP policy will only apply to UEFI based network booting. Regular BIOS based network booting will still use the default scope options set in the scope. | + | The below method assumes that your normal Scope options 066 and 067 are already setup for BIOS based network booting (without these already set, the below steps will not result in success). The below DHCP policy will only apply to UEFI based network booting. Regular BIOS based network booting will still use the default scope options set in the scope. |
You may substitute whatever Vendor Class Identifier you need in the ASCII field on step 3. | You may substitute whatever Vendor Class Identifier you need in the ASCII field on step 3. | ||
| Line 257: | Line 257: | ||
"PXEClient:Arch:00008", "PXEClient:Arch:00009", and "PXEClient:Arch:00007" should get "ipxe.efi" as their option 067 boot file. | "PXEClient:Arch:00008", "PXEClient:Arch:00009", and "PXEClient:Arch:00007" should get "ipxe.efi" as their option 067 boot file. | ||
| − | "PXEClient:Arch: | + | "PXEClient:Arch:00007:UNDI:003016" should get "ipxe7156.efi" this file is specific to the Surface Pro 4. |
| + | |||
| + | In order to support these other architectures, just re-run through the Server 2012 steps for each one, Set the matching (step 3) and the boot file for each accordingly, and change the names to reflect what they are. | ||
Latest revision as of 10:25, 8 February 2020
Contents
General
To make network booting for several different client platforms possible you'd have to offer adequate boot images for those clients. To be able to distinguish between varying platforms the DHCP server needs to utilize the information sent by the clients. According to RFC 4578 "the following pre-boot architecture types have been requested" (by the RFC):
           Type   Architecture Name
           ----   -----------------
             0    Intel x86PC
             1    NEC/PC98
             2    EFI Itanium
             3    DEC Alpha
             4    Arc x86
             5    Intel Lean Client
             6    EFI IA32
             7    EFI BC (EFI Byte Code)
             8    EFI Xscale
             9    EFI x86-64
There are different files that come with FOG that are pre-configured to work with these various architecture types. They are located in the /tftpboot directory usually. Here is more information on them: Filename Information
Using Linux DHCP
According to this post there are (at least) three different ways to configure ISC DHCP server that way: http://www.syslinux.org/archives/2014-October/022683.html
Edit /etc/dhcp/dhcpd.conf and add the 'authoritative' option to your subnet definition and the following classes anywhere in the config:
subnet ... {
    authoritative;
    ...
}
...

class "pxeclient" {
    match if substring (option vendor-class-identifier, 0, 9) = "PXEClient";

    if substring (option vendor-class-identifier, 15, 5) = "00000" {
        # BIOS client
        filename "undionly.kpxe";
    }
    elsif substring (option vendor-class-identifier, 15, 5) = "00006" {
        # EFI client 32 bit
        filename   "ipxe32.efi";
    }
    else {
        # default to EFI 64 bit
        filename   "ipxe.efi";
    }
}
Example 1
Here's a complete configuration example where TFTP and DNS is on the same Server. No router is defined in this configuration but can easily be added by changing X.X.X.X and un-commenting the line.
option space PXE;
option PXE.mtftp-ip    code 1 = ip-address;
option PXE.mtftp-cport code 2 = unsigned integer 16;
option PXE.mtftp-sport code 3 = unsigned integer 16;
option PXE.mtftp-tmout code 4 = unsigned integer 8;
option PXE.mtftp-delay code 5 = unsigned integer 8;
option arch code 93 = unsigned integer 16; # RFC4578

use-host-decl-names on;
ddns-update-style interim;
ignore client-updates;
next-server 192.168.1.1;
authoritative;

subnet 192.168.1.0 netmask 255.255.255.0 {
    option subnet-mask 255.255.255.0;
    range dynamic-bootp 192.168.1.10 192.168.1.254;
    default-lease-time 21600;
    max-lease-time 43200;
    option domain-name-servers 192.168.1.1;
    #option routers x.x.x.x;

    class "UEFI-32-1" {
    match if substring(option vendor-class-identifier, 0, 20) = "PXEClient:Arch:00006";
    filename "i386-efi/ipxe.efi";
    }

    class "UEFI-32-2" {
    match if substring(option vendor-class-identifier, 0, 20) = "PXEClient:Arch:00002";
     filename "i386-efi/ipxe.efi";
    }

    class "UEFI-64-1" {
    match if substring(option vendor-class-identifier, 0, 20) = "PXEClient:Arch:00007";
     filename "ipxe.efi";
    }

    class "UEFI-64-2" {
    match if substring(option vendor-class-identifier, 0, 20) = "PXEClient:Arch:00008";
    filename "ipxe.efi";
    }

    class "UEFI-64-3" {
    match if substring(option vendor-class-identifier, 0, 20) = "PXEClient:Arch:00009";
     filename "ipxe.efi";
    }

    class "Legacy" {
    match if substring(option vendor-class-identifier, 0, 20) = "PXEClient:Arch:00000";
    filename "undionly.kkpxe";
    }

}
Example 2
Here is another complete example setup for a 10.0.0.0/24 network where 10.0.0.3 is the TFTP server, 10.0.0.1 is the router, and 10.0.0.1 is the DNS Server. The range for this configuration is set to 10.0.0.20 through 10.0.0.254.
option space PXE;
option PXE.mtftp-ip    code 1 = ip-address;
option PXE.mtftp-cport code 2 = unsigned integer 16;
option PXE.mtftp-sport code 3 = unsigned integer 16;
option PXE.mtftp-tmout code 4 = unsigned integer 8;
option PXE.mtftp-delay code 5 = unsigned integer 8;
option arch code 93 = unsigned integer 16; # RFC4578

use-host-decl-names on;
ddns-update-style interim;
ignore client-updates;
next-server 10.0.0.3;
authoritative;


subnet 10.0.0.0 netmask 255.255.255.0 {
    option subnet-mask 255.255.255.0;
    range dynamic-bootp 10.0.0.20 10.0.0.254;
    default-lease-time 21600;
    max-lease-time 43200;
    option domain-name-servers 10.0.0.1;
    option routers 10.0.0.1;

    class "UEFI-32-1" {
    match if substring(option vendor-class-identifier, 0, 20) = "PXEClient:Arch:00006";
    filename "i386-efi/ipxe.efi";
    }

    class "UEFI-32-2" {
    match if substring(option vendor-class-identifier, 0, 20) = "PXEClient:Arch:00002";
     filename "i386-efi/ipxe.efi";
    }

    class "UEFI-64-1" {
    match if substring(option vendor-class-identifier, 0, 20) = "PXEClient:Arch:00007";
     filename "ipxe.efi";
    }

    class "UEFI-64-2" {
    match if substring(option vendor-class-identifier, 0, 20) = "PXEClient:Arch:00008";
    filename "ipxe.efi";
    }

    class "UEFI-64-3" {
    match if substring(option vendor-class-identifier, 0, 20) = "PXEClient:Arch:00009";
     filename "ipxe.efi";
    }

    class "Legacy" {
    match if substring(option vendor-class-identifier, 0, 20) = "PXEClient:Arch:00000";
    filename "undionly.kkpxe";
    }

}
When you have Mac OS clients as well you might want to check out this: FOG_on_a_MAC#architecture
Restart the DHCP service and you are good to go!
ISC-DCHP static IP address and other things
Here are a few examples of exclusively defined options based on MAC addresses. These would be placed at the very end of your dhcpd.conf file. You may use MAC matching to hand out static IP address or specific boot options.
#Just set a static IP based on MAC address. The "Optiplex380" is what is suggested as a hostname
# To my knowledge, only Linux respects this and offers it to the user for confirmation.

host Optiplex380 {
                        hardware ethernet F0:4D:A2:22:6E:2C;
                        fixed-address 10.0.0.6;
                }


#Define a static IP and a specific boot file for this computer.

host FOG {
                        hardware ethernet 00:13:72:AB:FD:7C;
                        fixed-address 10.0.0.3;
                        filename "My_Custom_Boot_File.kkpxe";
                }


#Make this access point use Google's DNS.

host TP-Link-Access-point {
                        hardware ethernet C4:E9:84:7D:F0:2E;
                        option domain-name-servers 8.8.8.8;
                }
Using ProxyDHCP (dnsmasq)
Related article: ProxyDHCP with dnsmasq
There are powerful matching rules in dnsmasq's configuration syntax. Here is an example of how this could be used to distingush between BIOS and UEFI. Note: This will NOT work in proxy mode!!
dhcp-match=set:bios,60,PXEClient:Arch:00000
dhcp-boot=tag:bios,undionly.kpxe,x.x.x.x,x.x.x.x        # x.x.x.x = TFTP/FOG server IP

dhcp-match=set:efi32,60,PXEClient:Arch:00006
dhcp-boot=tag:efi32,i386-efi/ipxe.efi,x.x.x.x,x.x.x.x   # x.x.x.x = TFTP/FOG server IP

dhcp-match=set:efibc,60,PXEClient:Arch:00007
dhcp-boot=tag:efibc,ipxe.efi,x.x.x.x,x.x.x.x            # x.x.x.x = TFTP/FOG server IP

dhcp-match=set:efi64,60,PXEClient:Arch:00009
dhcp-boot=tag:efi64,ipxe.efi,x.x.x.x,x.x.x.x            # x.x.x.x = TFTP/FOG server IP
Using Windows Server 2012 (R1 and later) DHCP Policy
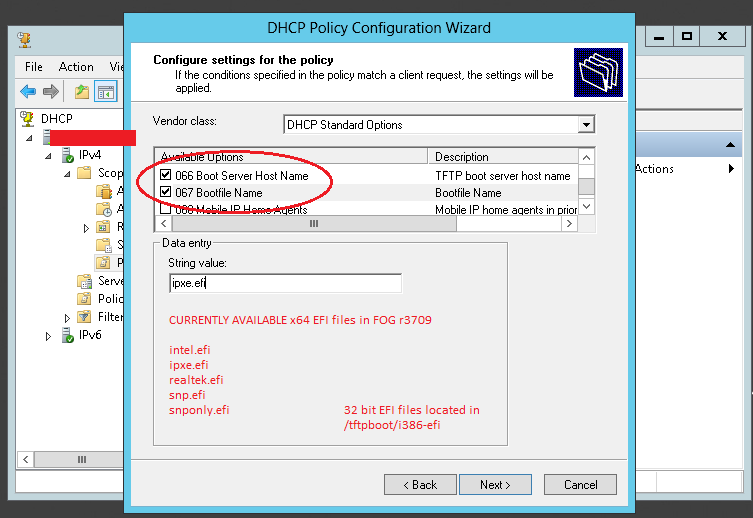
The below method assumes that your normal Scope options 066 and 067 are already setup for BIOS based network booting (without these already set, the below steps will not result in success). The below DHCP policy will only apply to UEFI based network booting. Regular BIOS based network booting will still use the default scope options set in the scope.
You may substitute whatever Vendor Class Identifier you need in the ASCII field on step 3.
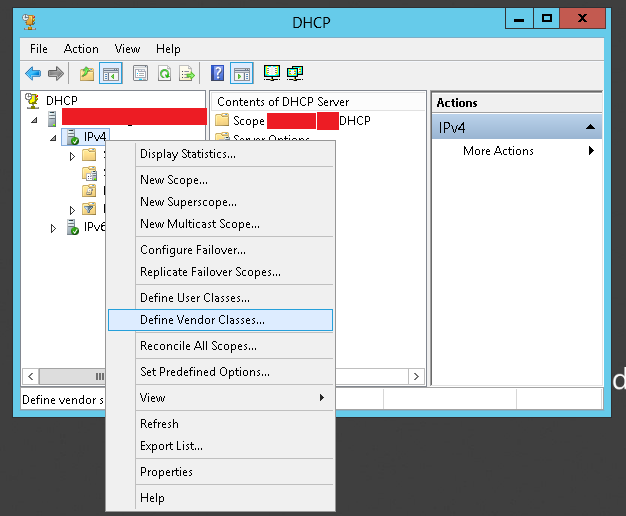
Step 1
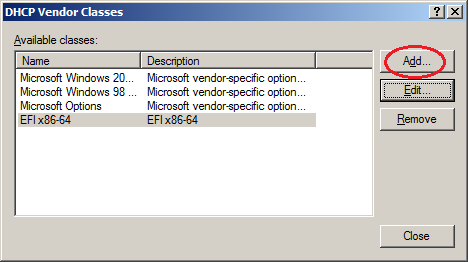
Right click IPv4, and pick "Define vendor class".
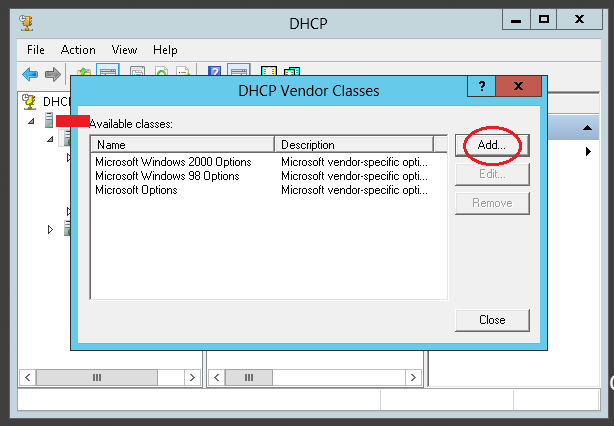
Step 2
Step 3
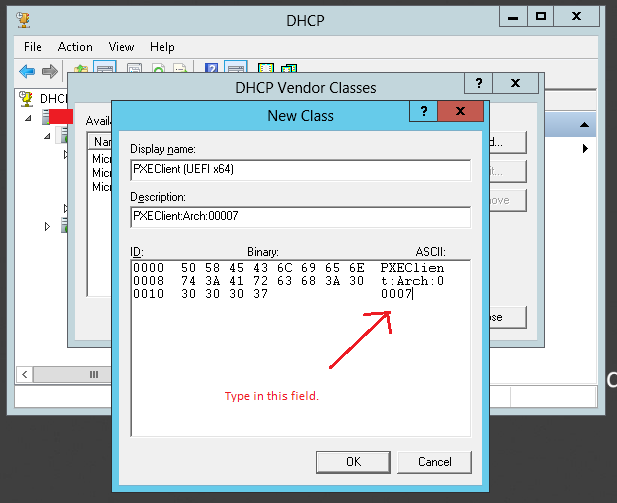
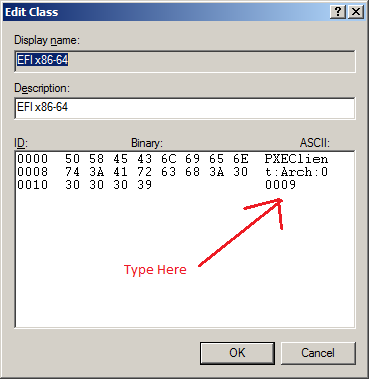
Here, The display name and description aren't really important but should describe what this does.
What's important is the "ASCII" field. In this field, you would type this, exactly, because it's case sensitive:
PXEClient:Arch:00007
As you type this in, the ID and Binary fields will auto-update. When done, click Ok, ok, ok to finish this part of the procedure.
NOTE:
There are many other UEFI architectures besides just "PXEClient:Arch:00007".
"PXEClient:Arch:00002" and "PXEClient:Arch:00006" both should get "i386-efi/ipxe.efi" as their option 067 boot file.
"PXEClient:Arch:00008", "PXEClient:Arch:00009", and "PXEClient:Arch:00007" should get "ipxe.efi" as their option 067 boot file.
"PXEClient:Arch:00007:UNDI:003016" should get "ipxe7156.efi" this file is specific to the Surface Pro 4.
In order to support these other architectures, just re-run through the Server 2012 steps for each one, Set the matching (step 3) and the boot file for each accordingly, and change the names to reflect what they are.
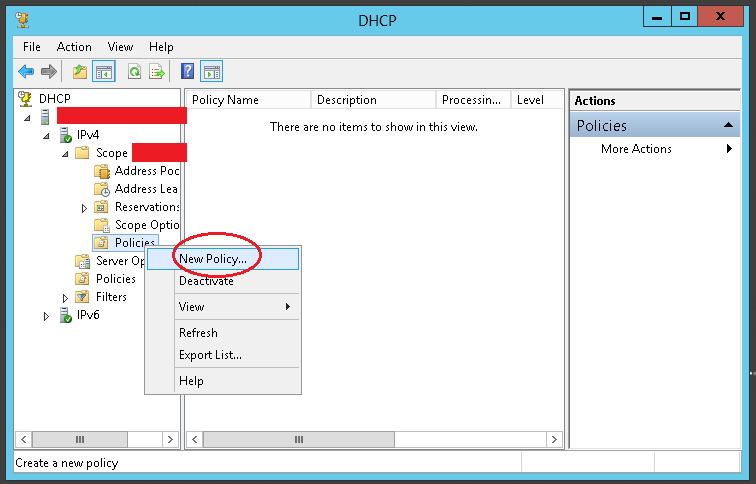
Step 4
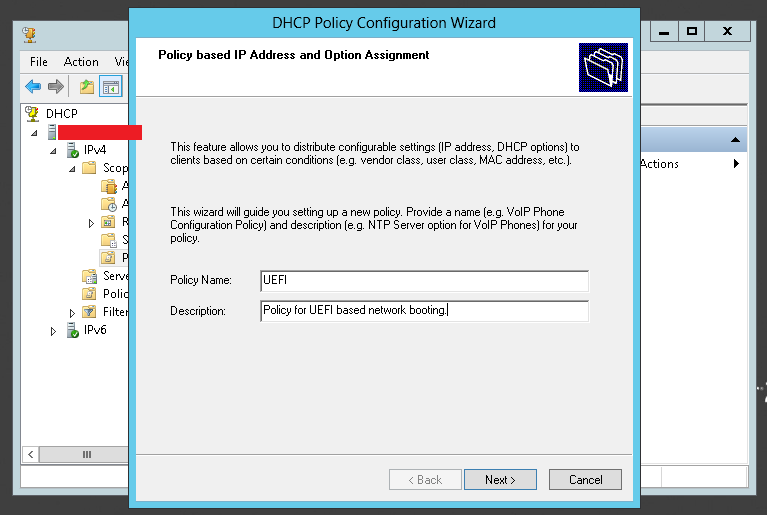
Underneath IPv4 -> Scope -> Policies, right click on "Policies" and choose "New Policy..."
Step 5
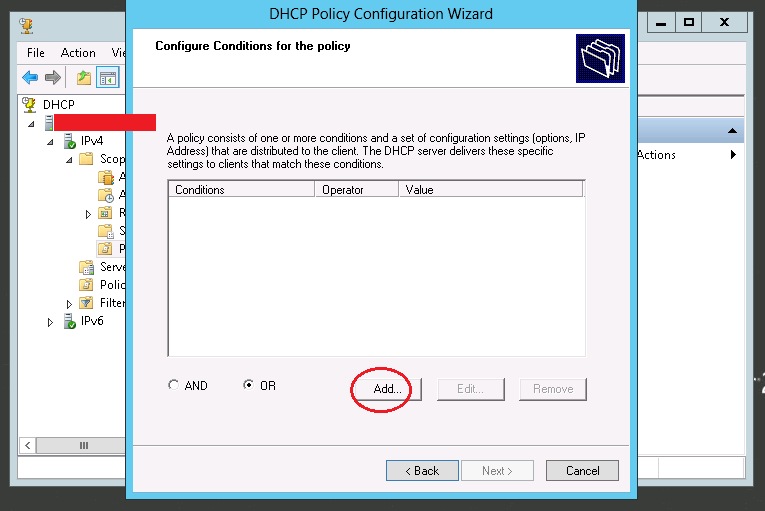
Step 6
Step 7
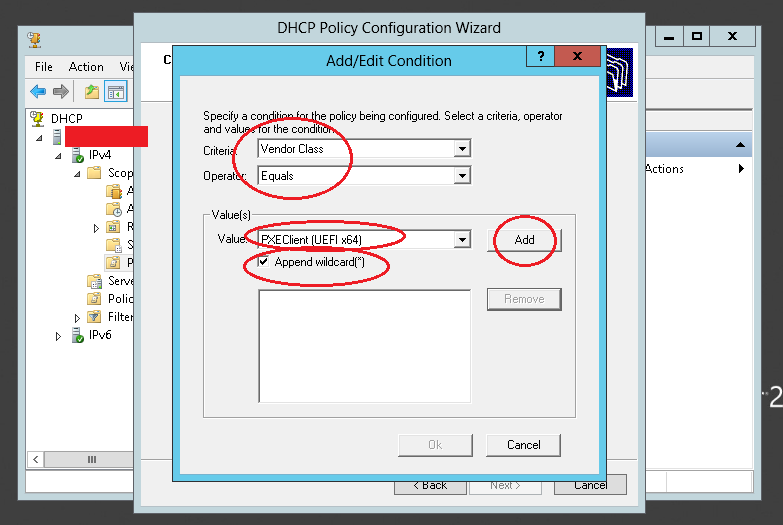
Step 8
Step 9
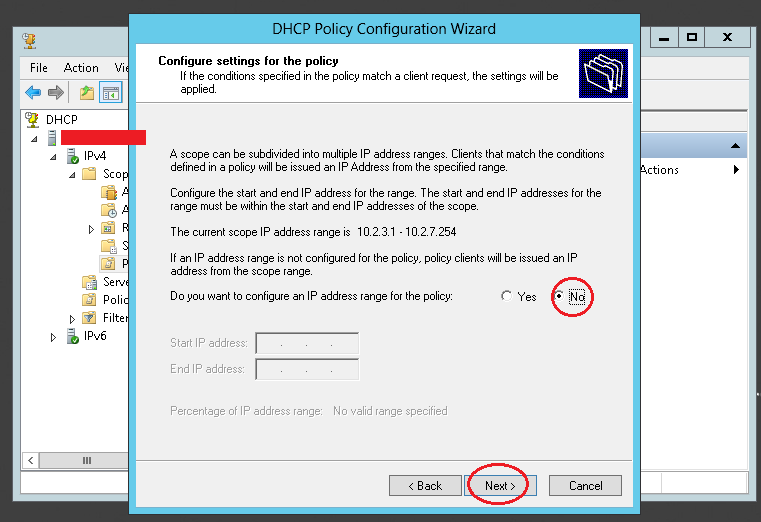
Step 10
Using Windows Server 2008 (and earlier) using DHCP Vendor Predefined options
This has been attempted unsuccessfully. The setup for Server 2008 is very similar to Windows Server 2012. You would create a Vendor Class and use the same vendor identifiers as used in Server 2012 and ISC-DHCP above, then you would set vendor predefined options for that class. The understanding is that you hard-code options 066 and 067 into your custom Vendor Class, and then can configure them after they are created for the class, and then later enable them on your server options or scope options.
However - Nobody in the FOG Community has succeeded with this as of yet. If you have it working, please let us know in the forums.
Here are some pictures of the unsuccessful steps taken, perhaps they can help out.
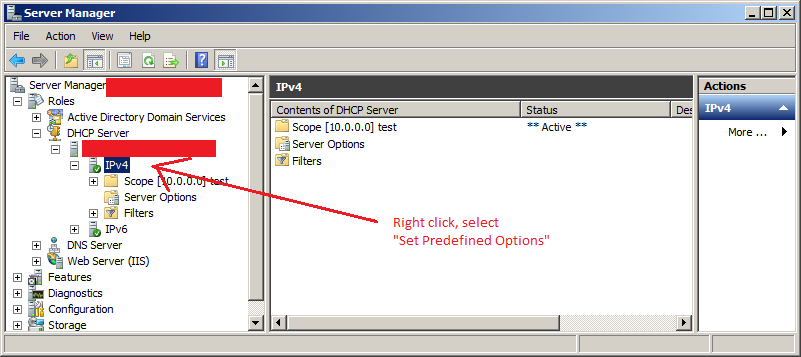
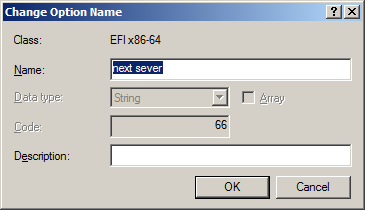
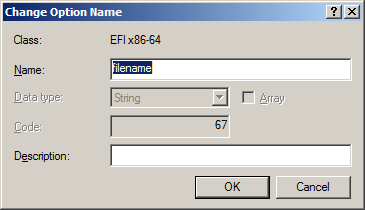
Right click to create the vendor class. Setup the class with the targeted vendor class identifier. Setup pre-defined options for the new class. Select the correct class in the drop down list and click add. Setup an option 66 and 67. After the options are created for the class, you can set their values in the Predefined options and values window. Enable these two options under the advanced tab of either scope options or server options.
Using OS X DHCP
Steps Here
Please list OS X steps here.'
Building custom DHCP Classes for co-existence with FOG
It's possible and easy to configure ISC-DHCP and Windows Server 2012 to support network booting with FOG and other devices (like IP Phones or Apple products) configurations at the same time on the same network. You would simply use Wireshark to examine the DHCP Request broadcast from the device and examine it's option 060. This will be a string. You'd then create a Vendor Class for that device and supply it with the correct option, in windows 066 and 067, in ISC-DHCP next-server and filename.
In the ISC-DHCP examples for IPXEClient architures, you see 0, 20, this means to start the string comparison at character zero and end 20 characters after the starting place. You may begin at 15 or even 20, but the next digit defines how much further to compare.
For example, Legacy clients send this in their DHCP Request option 060:
PXEClient:Arch:00000
To match this string with a class, any of these will work:
match if substring(option vendor-class-identifier, 0, 20) = "PXEClient:Arch:00000";

match if substring(option vendor-class-identifier, 15, 5) = "00000";

match if substring(option vendor-class-identifier, 19, 1) = "0";
Obviously the less you use to compare, the more chances you'll have of DHCP handing out incorrect options to the various devices on your network due to mismatches.
For example, This line would (incorrectly) match the below IP Phone's option 060:
match if substring(option vendor-class-identifier, 19, 1) = "0";
"Cisco VOIP phone 000562"
It would also match this string:
"PXEClient:Arch:00000"
Because the 20th character is a zero, this IP phone using the above configuration would be matched and given the defined options instead of the correct options. I made up this example just to show the possibility of a class mismatch if the matching is limited too much.
In Windows Server DHCP, you cannot match like you can in ISC-DHCP, however you can define a string value of your liking when you setup a Vendor Class.
Relevant Resources
Articles related to ISC-DHCP
