Difference between revisions of "Use FOG with FreeNAS"
m (→How to: Use FOG (1.1.2) with FreeNAS (Storage node - 9.1.1)) |
m (Changed terminology to use capture instead of upload.) |
||
| (24 intermediate revisions by one other user not shown) | |||
| Line 7: | Line 7: | ||
I* consider that your FreeNAS is ok for the installation and NIC. | I* consider that your FreeNAS is ok for the installation and NIC. | ||
| − | ===Pre-Configuration== | + | ===Pre-Configuration=== |
| − | *Fog Server: 192.168.56.102 | + | *IP Addresses (These are not required but set as example) |
| − | *FreeNAS: 192.168.56.240 | + | **Fog Server: 192.168.56.102 |
| + | **FreeNAS: 192.168.56.240 | ||
| + | ==='''FOG Server'''=== | ||
| − | + | #'''Storage Management''' | |
| − | |||
| − | |||
#*Add the Storage node. | #*Add the Storage node. | ||
#*Storage Node Name: FNAS | #*Storage Node Name: FNAS | ||
| Line 22: | Line 22: | ||
#*Image Path: /mnt/Volume1/data/images | #*Image Path: /mnt/Volume1/data/images | ||
#*User/Pass: Free/Free (Not very secure ;) ) | #*User/Pass: Free/Free (Not very secure ;) ) | ||
| − | # | + | #'''Image Management''' |
#*For your image, choose the storage group witch contains the new storage node. | #*For your image, choose the storage group witch contains the new storage node. | ||
| − | + | ==='''FreeNAS'''=== | |
| − | # | + | #'''Add Volume1''' |
#*Storage -> ZFS Volume Manager: | #*Storage -> ZFS Volume Manager: | ||
#*Volume Name: Volume1 | #*Volume Name: Volume1 | ||
#*Volume layout: All the disk (in my case) | #*Volume layout: All the disk (in my case) | ||
| − | + | #'''Create the path''' | |
| − | # | ||
#*Clic on Volume1 -> Create ZFS Dataset: | #*Clic on Volume1 -> Create ZFS Dataset: | ||
#*Dataset Name: data | #*Dataset Name: data | ||
| Line 48: | Line 47: | ||
#*Enable atime: inherit | #*Enable atime: inherit | ||
#*ZFS Deduplication: inherit | #*ZFS Deduplication: inherit | ||
| − | [[File:FreeNAS DirectoryStructure.png]] | + | #*[[File:FreeNAS DirectoryStructure.png|border]] |
| − | + | #'''Create .mntcheck''' | |
| − | |||
| − | # | ||
#*On the folder "/images" and "/dev", create the file ".mntcheck" | #*On the folder "/images" and "/dev", create the file ".mntcheck" | ||
#*CMD: touch .mntcheck | #*CMD: touch .mntcheck | ||
| − | + | #'''Create new user''' | |
| − | # | ||
#*Account -> Users -> Add User | #*Account -> Users -> Add User | ||
#*Username: Free | #*Username: Free | ||
| Line 61: | Line 57: | ||
#*Home Directory: /mnt/Volume1/data/images | #*Home Directory: /mnt/Volume1/data/images | ||
#*Home Directory Mode: 777 | #*Home Directory Mode: 777 | ||
| − | [[File:FreeNAS User.png]] | + | #*[[File:FreeNAS User.png|border]] |
| + | #'''Permission for the path''' | ||
| + | #*Storage -> clic on data/images -> Change Permissions | ||
| + | #*User: Free | ||
| + | #*group: Free | ||
| + | #*Mode: 777 | ||
| + | #*Type of ACL: Unix | ||
| + | #*Set Permission recursively: YES | ||
| + | #*Verification: cmd: ls -laR /mnt/Volume1/data/images | ||
| + | #'''NFS''' | ||
| + | #*Don't edit "/etc/exports". In my case, when i restart the service, the file faded. I had to WEBGui. | ||
| + | #*On the left. | ||
| + | #*Sharing -> Inux (NFS) Shares -> Add Unix (NFS) Share. | ||
| + | #*Comment:... | ||
| + | #*Authorized networks: 192.168.56.0/24 | ||
| + | #*All directories: OK | ||
| + | #*Maproot User: Free | ||
| + | #*Maproot Group: Free | ||
| + | #*Path: /mnt/Volume1/data/images | ||
| + | #*OK. | ||
| + | #*[[File:FreeNAS NFS.png|border]] | ||
| + | #* | ||
| + | #*Idem for the folder "/dev" | ||
| + | #* | ||
| + | #*[[File:FreeNAS dev.png|border]] | ||
| + | #*Verification: | ||
| + | #*cmd: cat /etc/exports | ||
| + | #*[[File:FreeNAS Exports.png|border]] | ||
| + | #'''FTP (I don't know if it's really necessary)''' | ||
| + | #*Services -> FTP -> Advenced Mode | ||
| + | #*Path: /mnt/Volume1/data/images | ||
| + | #*File Permission: 666 | ||
| + | #*Directory Permission: 777 | ||
| + | ===Capturing Image=== | ||
| − | + | *Now: you can capture your client | |
| + | *Problem, you may also get an error message at the end: FOGFTP: failed to rename file. | ||
| + | **http://www.fogproject.org/wiki/index.php/Images_Directory_Permissions | ||
| − | + | *Method 1 doesn't works with me, so i use method 2. [[Use_FOG_with_FreeNAS#Notes:|*]] | |
| + | *[[File:FreeNAS FTP Will Not Rename And Move.png|border]] | ||
| + | *CMD: cp -a /mnt/Volume1/data/image/dev/@MAC /mnt/Volume1/data/images/NameOfYourImage | ||
| + | *cp -a to keep the same permission. | ||
| − | |||
| − | + | *'''That's it.''' | |
| − | + | == Notes: == | |
| − | |||
| − | |||
| − | |||
| − | |||
| − | |||
| − | |||
| − | |||
| + | *This tutorial was created using content from this thread: [http://fogproject.org/forum/threads/how-to-use-fog-1-1-2-with-freenas-storage-node-9-1-1.12821/ How to: Use FOG (1.1.2) with FreeNAS (Storage node - 9.1.1)] | ||
| − | + | * '''*''' Further investigation into the "FOGFTP: failed to rename file". This is most likely a permissions issue that needs to be corrected. (FOG Dev Team) | |
| − | |||
| − | |||
| − | |||
| − | |||
| − | |||
| − | |||
| − | |||
| − | |||
| − | |||
| − | |||
| − | |||
| − | |||
| − | |||
| − | |||
| − | |||
| − | |||
| − | |||
| − | |||
| − | |||
| − | |||
| − | |||
| − | |||
| − | |||
| − | |||
| − | |||
| − | |||
| − | |||
| − | |||
| − | |||
| − | |||
| − | |||
| − | |||
| − | |||
| − | |||
| − | |||
| − | |||
| − | |||
| − | |||
| − | |||
| − | |||
| − | |||
| − | |||
| − | |||
| − | |||
| − | |||
| − | |||
| − | |||
| − | |||
| − | |||
| − | |||
| − | |||
| − | |||
| − | |||
| − | |||
| − | |||
| − | |||
| − | |||
| − | |||
| − | |||
| − | |||
| − | |||
| − | |||
| − | |||
| − | |||
| − | |||
Latest revision as of 04:42, 8 July 2016
Contents
How to: Use FOG (1.1.2) with FreeNAS (Storage node - 9.1.1)
- I have often seen people want to use Fog Server with a Storage Node FreeNAS. At my office, it works so i describe you step by step how to do.
There are probably several solutions i think, but i propose you a simple solution that works with me.
I* consider that your FreeNAS is ok for the installation and NIC.
Pre-Configuration
- IP Addresses (These are not required but set as example)
- Fog Server: 192.168.56.102
- FreeNAS: 192.168.56.240
FOG Server
- Storage Management
- Add the Storage node.
- Storage Node Name: FNAS
- IP Address: 192.168.56.240
- Is Master Node: As you want.
- Group: As you want.
- Image Path: /mnt/Volume1/data/images
- User/Pass: Free/Free (Not very secure ;) )
- Image Management
- For your image, choose the storage group witch contains the new storage node.
FreeNAS
- Add Volume1
- Storage -> ZFS Volume Manager:
- Volume Name: Volume1
- Volume layout: All the disk (in my case)
- Create the path
- Clic on Volume1 -> Create ZFS Dataset:
- Dataset Name: data
- Compression level: inherit
- Enable atime: inherit
- ZFS Deduplication: inherit
- Clic on data -> Create ZFS Dataset:
- Dataset Name: images
- Compression level: inherit
- Enable atime: inherit
- ZFS Deduplication: inherit
- Clic on images -> Create ZFS Dataset:
- Dataset Name: dev
- Compression level: inherit
- Enable atime: inherit
- ZFS Deduplication: inherit

- Create .mntcheck
- On the folder "/images" and "/dev", create the file ".mntcheck"
- CMD: touch .mntcheck
- Create new user
- Permission for the path
- Storage -> clic on data/images -> Change Permissions
- User: Free
- group: Free
- Mode: 777
- Type of ACL: Unix
- Set Permission recursively: YES
- Verification: cmd: ls -laR /mnt/Volume1/data/images
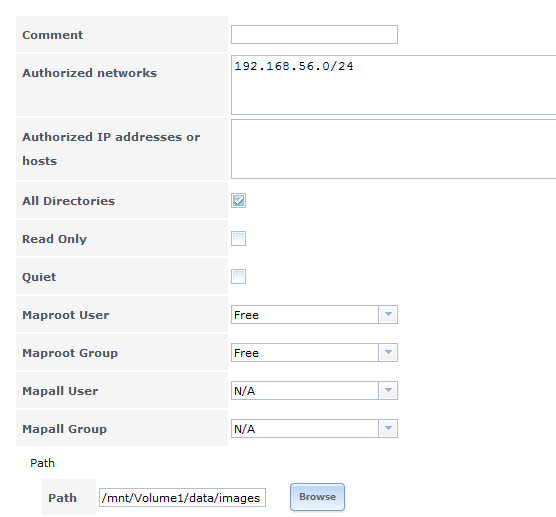
- NFS
- Don't edit "/etc/exports". In my case, when i restart the service, the file faded. I had to WEBGui.
- On the left.
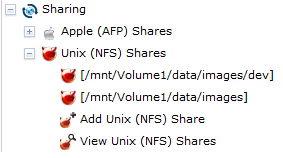
- Sharing -> Inux (NFS) Shares -> Add Unix (NFS) Share.
- Comment:...
- Authorized networks: 192.168.56.0/24
- All directories: OK
- Maproot User: Free
- Maproot Group: Free
- Path: /mnt/Volume1/data/images
- OK.

- Idem for the folder "/dev"

- Verification:
- cmd: cat /etc/exports

- FTP (I don't know if it's really necessary)
- Services -> FTP -> Advenced Mode
- Path: /mnt/Volume1/data/images
- File Permission: 666
- Directory Permission: 777
Capturing Image
- Now: you can capture your client
- Problem, you may also get an error message at the end: FOGFTP: failed to rename file.
- Method 1 doesn't works with me, so i use method 2. *

- CMD: cp -a /mnt/Volume1/data/image/dev/@MAC /mnt/Volume1/data/images/NameOfYourImage
- cp -a to keep the same permission.
- That's it.
Notes:
- This tutorial was created using content from this thread: How to: Use FOG (1.1.2) with FreeNAS (Storage node - 9.1.1)
- * Further investigation into the "FOGFTP: failed to rename file". This is most likely a permissions issue that needs to be corrected. (FOG Dev Team)
