Difference between revisions of "Include any ISO in the FOG Bootmenu"
m (added more references) |
|||
| Line 254: | Line 254: | ||
boot || goto MENU | boot || goto MENU | ||
| + | = System Rescue CD = | ||
| + | |||
| + | Project homepage: [https://www.system-rescue-cd.org/SystemRescueCd_Homepage https://www.system-rescue-cd.org/SystemRescueCd_Homepage] | ||
| + | |||
| + | Instructions confirmed working with version 2.4.1 and version 4.8.1 | ||
| + | |||
| + | Extract the following files to <font color="red">/var/www/html/srcd</font> | ||
| + | |||
| + | <pre> | ||
| + | initram.igz | ||
| + | rescue64 | ||
| + | sysrcd.dat | ||
| + | sysrcd.md5 | ||
| + | </pre> | ||
| + | |||
| + | Menu entry should look like below: | ||
| + | |||
| + | [[File:System rescue.png]] | ||
= Additional references = | = Additional references = | ||
[http://www.synology-wiki.de/index.php/PXE http://www.synology-wiki.de/index.php/PXE] | [http://www.synology-wiki.de/index.php/PXE http://www.synology-wiki.de/index.php/PXE] | ||
Revision as of 15:40, 12 October 2016
Contents
When troubleshooting issues with iPXE booting regarding anything at all ( including booting ISOs over a network ), it helps to know exactly what the boot menu has inside it. Where x.x.x.x is the FOG server's IP address, put this into a browser's address bar:
x.x.x.x/fog/service/ipxe/boot.php
PartedMagic
Newer (January 2016)
This has been tested running 1.3.0 on Debian 8.2:
Note: When following the below steps, please remember that everything in Linux is case sensitive.
Extract the files from the pmagic.iso to a local directory (this will be temporary)
Open a terminal as root, cd to /extractediso/boot/pxelinux/ and copy the files needed to boot pmagic to a new directory in /var/www/html/, if 64bit you will need bzimage64, initrd.img, fu.img and m64.img.;
mkdir /var/www/html/pmagic/
Run the following command to create files.cgz
sh pm2pxe.sh
This will create a /pm2pxe/ directory wherever you ran the command from with files.cgz in it. Now you can copy that file in /var/www/html/pmagic/
cp /extractediso/boot/pxelinux/pm2pxe/files.cgz /var/www/html/pmagic/
Now for the boot entry, here: Web Interface -> FOG Configuration -> iPXE New Menu Entry Add the below lines to a new menu entry.
kernel http://${fog-ip}/pmagic/bzImage64
initrd http://${fog-ip}/pmagic/initrd.img
initrd http://${fog-ip}/pmagic/files.cgz
initrd http://${fog-ip}/pmagic/fu.img
initrd http://${fog-ip}/pmagic/m64.img
imgargs bzImage64 boot=live ip=dhcp edd=on noapic load_ramdisk=1 prompt_ramdisk=0 rw vga=normal sleep=0 loglevel=0 keymap=us splash quiet - || read void
boot || read void
- Here's an interesting twist, if you have a version of Parted Magic that prompts you everytime to choose a time zone and you would like to get rid of this or if there's any configuration you make in the live environment that you'd like to see stick. You can boot from a usb stick (YUMI is a great tool if you want to add partedmagic.iso to an easy bootable usb) choose the timezone setting that works for you and when get to the logout prompt, choose 'Save session'. This will create a 099-saved-session.sqfm file in /pmagic/pmodules folder wherever PartedMagic is on your usb. Just copy this file in /extractediso/pmagic/pmodules/ and run the pm2pxe.sh script again. It will create a new files.cgz containing your saved sessions and will load it automagically!
After you confirm this is working you can go ahead and delete the extracted iso folder.
Reference
Integrating PartedMagic in Fog 1.2.0
Older
Note: Original steps intended for 1.2.0 and below. 1.3.0 would use the web interface to create a custom boot menu item and would not require file editing at the OS level. Original instructions below have been left intact.
In this example I will use the PartedM agic ISO, but Clonezilla, Linux distributions, Hirens Boot CD, and other bootable ISO's can be used.
Create a folder in /tftpboot/fog/ called partedmagic, copy the partedmagic.iso file into this folder and also copy and paste the MemDisk file found in /tftpboot/fog/
Browse to /tftpboot/pxelinux.cfg/ and edit the 'default' file in there and add:
LABEL PartedMagic
        kernel fog/partedmagic/memdisk
        append iso initrd=fog/partedmagic/partedmagic.iso raw
        MENU PartedMagic
        TEXT HELP
        Gparted + Clonezilla + Firefox
        ENDTEXT
You can also see this forum post for more instruction - [1]
Please remember that if you create a new folder in the /tftpboot directory you will also need to include MemDisk in the same folder! The link above also includes a TFTP folder you can use to try on your own. It includes DBAN and Dell diagnostics's .ISO's.
Note: In FOG 1.3.0+, the MemDisk kernel is included as a default unless specified otherwise.
DBAN
This is a guide for adding Darik's Boot and Nuke (DBAN) to FOG 1.3.0. While following the below tutorial, please keep in mind that everything in Linux is case sensitive.
Backend
For this example, we will be using Fedora 21 Server; these commands should work for CentOS and RHEL as well. For Debian/Ubuntu based distributions you should only need to change the web directory paths to (maybe?) exclude the /html part.
Please note that the below wget URL will likely need updated to a current URL for the latest DBAN ISO.
Here is a step-by-step explanation of what the below commands do:
- Make a directory in the root directory called "iso."
- Make a directory in the web folder called "dban."
- Get the latest copy of dban using wget (URL likely needs updated) and put it into the "iso" directory with the name "dban.iso."
- Mount the dban.iso file to the "dban" web directory as read-only (must be read only for ISOs).
These commands are executed on your FOG server via CLI with sudo or root permissions:
mkdir /iso
mkdir /var/www/html/dban
wget -O /iso/dban.iso http://downloads.sourceforge.net/project/dban/dban/dban-2.3.0/dban-2.3.0_i586.iso
mount -t iso9660 -o loop /iso/dban.iso /var/www/html/dban
If you've done the steps above correctly, you should be able to visit the directory in a web browser like so to see the files inside the ISO:
x.x.x.x/dban
Frontend
Now we must add a new entry to the FOG boot menu. For this, we will navigate in the FOG web UI to here:
FOG Configuration -> iPXE New Menu Entry
In this menu, you will add the below information.
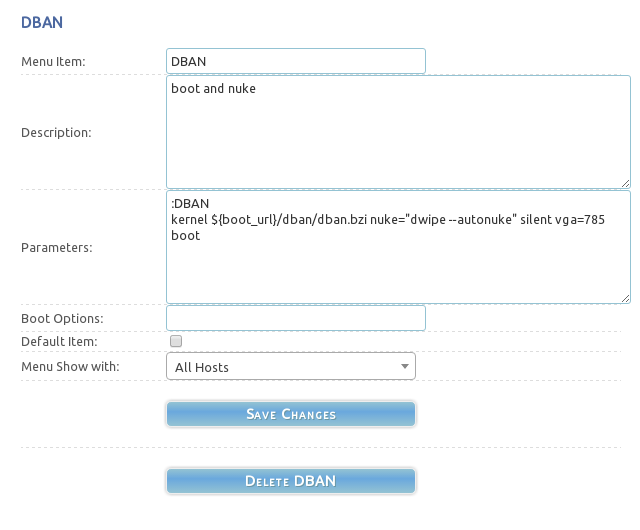
Menu Item: DBAN
Description: Boot and nuke (This is what the menu displays)
Parameters:
:DBAN
kernel ${boot_url}/dban/dban.bzi nuke="dwipe --autonuke" silent vga=785
boot
Menu Show with: All Hosts
It should look something like this when you're done:
NOTE: You don't change the {boot_url} part, it's an environment variable.
NOTE: Some have reported that this works for them without the double quotes around this part: dwipe --autonuke but you may not have this problem.
Other Parameter Options
autonuke
kernel ${boot_url}/dban/dban.bzi nuke="dwipe --autonuke" silent nousb vga=785
dban
kernel ${boot_url}/dban/dban.bzi nuke="dwipe" silent vga=785
dod
kernel ${boot_url}/dban/dban.bzi nuke="dwipe --autonuke --method dod522022m" silent vga=785
dod3pass
kernel ${boot_url}/dban/dban.bzi nuke="dwipe --autonuke --method dod3pass" silent vga=785
dodshort
kernel ${boot_url}/dban/dban.bzi nuke="dwipe --autonuke --method dodshort" silent vga=785
gutmann
kernel ${boot_url}/dban/dban.bzi nuke="dwipe --autonuke --method gutmann" silent vga=785
ops2
kernel ${boot_url}/dban/dban.bzi nuke="dwipe --autonuke --method ops2" silent vga=785
paranoid
kernel ${boot_url}/dban/dban.bzi nuke="dwipe --autonuke --method prng --rounds 8 --verify all" silent vga=785
prng
kernel ${boot_url}/dban/dban.bzi nuke="dwipe --autonuke --method prng --rounds 8" silent vga=785
quick
kernel ${boot_url}/dban/dban.bzi nuke="dwipe --autonuke --method quick" silent vga=785
zero
kernel ${boot_url}/dban/dban.bzi nuke="dwipe --autonuke --method zero" silent vga=785
Resources
https://forums.fogproject.org/topic/4069/fog-1-2-0-dban-advanced-pxe-boot-menu
Hirens 15.04
Note: Applies to FOG 1.3.0 (Fog Trunk)
First in your /etc/exports add this line:
/var/www/fog/iso/15.04_64 *(ro,sync,no_wdelay,insecure_locks,no_root_squash,insecure)
Then restart NFS. [NFS Service CLI Controls]
Next, extract the Ubuntu ISO to a directory named 15.04_64 in your /var/www/fog/iso directory.
In your Advanced menu use this:
:MENU
menu
item --gap – ---------------- iPXE boot menu ----------------
item ubuntu15.04_64 Boot Ubuntu 15.04
item return return to previous menu
:ubuntu15.04_64
set path /fog/iso/15.04_64
set nfs_path /var/www/fog/ISO/15.04_64
kernel http://${fog-ip}${path}/casper/vmlinuz.efi || read void
initrd http://${fog-ip}${path}/casper/initrd.lz || read void
imgargs vmlinuz.efi root=/dev/nfs boot=casper netboot=nfs nfsroot=${fog-ip}:${nfs_path} ip=dhcp splash quiet – || read void
boot || read void
goto start
You don’t have to set the variables. I just did it that way in case I ever have to change where the ISO directory lives.
Bitdefender
Note: Applies to FOG 1.3.0 (Fog Trunk)
cd /tmp && wget http://download.bitdefender.com/rescue_cd/bitdefender-rescue-cd.iso
sudo mount -o loop /tmp/bitdefender-rescue-cd.iso /mnt
sudo cp -R /mnt/rescue/ /images/dev
sudo cp /mnt/boot/kernel.* /mnt/boot/initfs.* /var/www/html/fog/service/ipxe/
This way we misuse the /images/dev NFS share. Take a look at the section on hirens boot CD if you want to add a seperate share for this.
And here is the iPXE config (the kernel statement needs to be in one line - just breaking it up here for better reading):
:bitdefender
kernel http://${fog-ip}/${fog-webroot}/service/ipxe/kernel.i386-pc root=/dev/nfs real_root=/dev/nfs
       nfsroot=${fog-ip}:/images/dev  ip=${ip} loop=/rescue/livecd.squashfs looptype=squashfs
       livecd.nfsif=${net0/mac} initrd udev cdroot quiet splash
initrd http://${fog-ip}/${fog-webroot}/service/ipxe/initfs.i386-pc
boot || goto MENU
System Rescue CD
Project homepage: https://www.system-rescue-cd.org/SystemRescueCd_Homepage
Instructions confirmed working with version 2.4.1 and version 4.8.1
Extract the following files to /var/www/html/srcd
initram.igz
rescue64
sysrcd.dat
sysrcd.md5
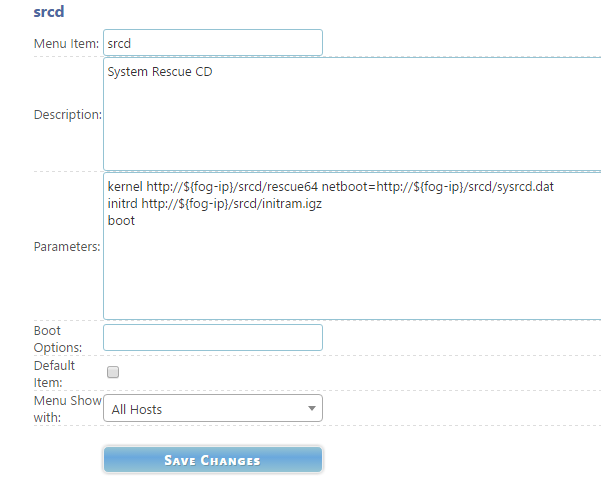
Menu entry should look like below:

