Booting into FOG and Uploading your first Image
For many of us this will be the first encounter of FOG from a client machine. This article starts with explaining how to boot into FOG (what we actually call the FOS - FOG OS) and register a host, then moves on to how to create an image object. Finally, you'll start to upload a new image to the FOG server. There are quite a few things that can possibly go wrong in this process and we try to point out how to find and solve those issues.
Contents
Most common issues
Here is a quick listing of things people mostly run into when having trouble with the boot process - we'll dive into the details later on:
- Layer 1 issue like cable (don't laugh - this has cost a couple of people many hours)
- Spanning tree issue (make sure to configure RSTP and/or "port fast")
- Auto-negotiation issue (try configuring static speed instead of auto-negotiation for that port)
- Ethernet energy saving (see if your switch has EEE/802.3az feature and disable if possible)
- more to come
Summary
During the PXE booting process there are three distinct transitions as each of the kernel(s) boot. PXE ROM -> iPXE -> linux kernel/FOG target OS (FOS). Each one of these transitions causes the network link light to "wink" or go out for a second or two as the new booting kernel configures the network interface.
-Short video sample goes here-
More to come
Physical connection
First of all make sure the client is connected to the network in which your FOG server resides. And I really mean this! We have seen very strange issues where clients miss DHCP or even just randomly fail - only because the patch cable used was not in a good condition. Please keep that in mind when you run into trouble! When turning the client on keep an eye on the LED of you network interface card (NIC). It turns on and off a couple of times while booting because the NIC is being re-initialized more than once. This is fine if your network equipment is configured correctly but I might cause trouble if you have the old version of the so called spanning tree protocol (STP) enabled. STP is a layer 2 (MAC) protocol to prevent from loops within your network. If spanning tree is enabled, in normal mode, it takes about 30 seconds to the switch port to move to a forwarding state. No packets will be delivered while the port is not in forwarding state yet. Since the booting process is fast, by the time the switch goes into the forwarding state it's too late for the client to get an IP via DHCP when trying to PXE boot. Configure your main switch to use RSTP (rapid spanning tree protocol) or configure your client ports with port-fast setting.
Some network cards don't seem to play nicely when it comes to auto-negotiation while PXE booting. Again closely watch the NIC LEDs while booting up. Those issues you might only find by trail and error. Try setting static speed instead auto-negotiation for this port on your main switch or use an intermediate mini switch for testing.
As well Energy Efficient Ethernet (EEE) can cause trouble. Some drivers don't handle the EEE feature very well and kind of shut down the NIC although it should be in use. Consult your switch's handbook to see if it does have EEE (also called 802x.az) feature. See is you can disable EEE per port or altogether.
Use a mini or unmanaged switch between the target computer and your LAN switch to circumnavigate any problem related to the physical link layer. These mini switches are dumb (which is a good thing) they just pass traffic and don't do any advanced stuff. In case of spanning tree the mini switch isolates the target computer's network wink, keeping the connection up and therefore prevent from that 30 second delay. As well if you have a auto-negotiation issue the unmanaged switch might help.
PXE booting
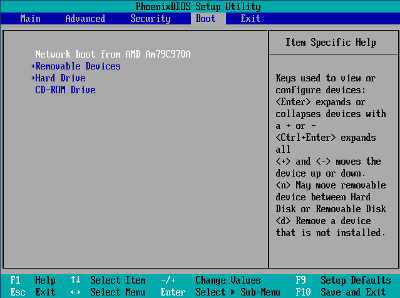
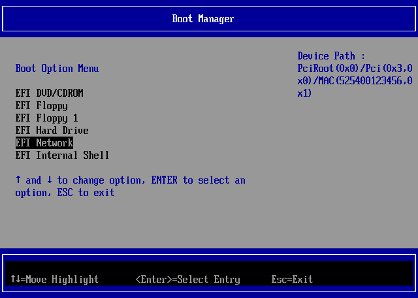
Boot up your client computer and try to have it PXE boot by pressing F12 (usually). More often then not, this works or at the very least, gets you to a "boot options" menu. This way you can PXE boot the client on the fly without changing BIOS settings. With that said, there are cases where PXE needs to be first enabled before you can use it and most often you want to change to always boot via PXE to be able to fully use FOG. For that you need to enter the BIOS setup - this step may be a little different for every computer though. In most cases this involves pressing either F2, F10, or DEL while you see BIOS POST messages on screen. There you should be able to enable PXE/network booting and change boot order, so the first boot device is PXE boot. The pictures show BIOS boot setup (left) and UEFI boot option selection (right):
As well FOG makes extensive use of Wake On LAN (WOL) to automatically boot clients which are scheduled for tasking. While you are in BIOS/UEFI setup anyway make sure WOL is enabled and check if there is an option called "Network startup: from server/from hard drive". Clients which have this option won't PXE boot on WOL if "from hard disk" is selected! Make sure you set it to "from server".
First DHCP DORA
Beside the BIOS settings on the client you need to have a DHCP server within your network for PXE booting! Usually DHCP is used to automatically hand out IP addresses to clients. But there is a lot more DHCP can do. For FOG we need DHCP to send next-server (option 66) and filename (option 67) to the PXE booting client's. When PXE boot is enabled the NICs PXE ROM is in control on boot, first trying to request an IP and PXE boot information via DHCP and then loads the filename from the given host (next-server) via TFTP protocol.
PXE-E11
ARP timeout
PXE-E3x
Several different TFTP errors like timeout and file not found. Please follow the Troubleshoot_TFTP guide!
PXE-E51
No DHCP or proxyDHCP offers were received - The client did not receive any valid DHCP, BOOTP, or proxyDHCP offers.
PXE-E52
proxyDHCP offers were received. No DHCP offers were received - The client did not receive any valid DHCP or BOOTP offers. The client did receive at least one valid proxyDHCP offer.
PXE-E53
No boot filename received - The client received at least one valid DHCP/BOOTP offer but does not have a boot filename to download.
PXE-E55
ProxyDHCP service did not reply to request on port 4011 - The client issued a proxyDHCP request to the DHCP server on port 4011 but did not receive a reply.
PXE-E61
Media test failure, check cable
Beside all those errors there is always a chance that a bad patch cable can cause problems in this stage of booting. As well we have seen buggy BIOS/UEFI firmware causing issues.
...
Second DHCP DORA
...
FOS
...
Third DHCP DORA
...
Register the Client with the FOG Server
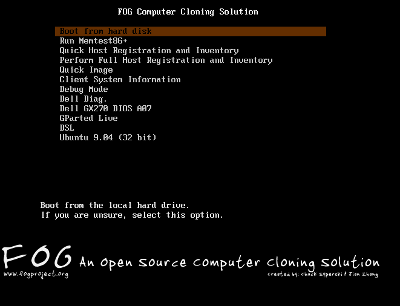
Now that the client is pxe booting, we can register it with the FOG server. To do so, select "Perform Full Host Registration and Inventory." During this process you will be asked to answer a few questions like the client's hostname etc. After filling out all questions, the client will go through a quick hardware inventory and restart, at which point the client will be registered with the FOG server.
Create an image object
At this point we must log into the web interface for FOG, this can be done on any PC with network access and web browser.
- Open a browser and navigate to http://[yourserverip]/fog.
- Login to the server (default username is fog and default password is password).
- Navigate to the images section which is the icon in the top row that looks like picture.
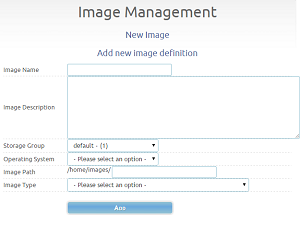
- On the left hand menu select Create New Image.
- Enter a meaningful Image Name (no special characters)
- Enter a description if you wish.
- Under storage group, select default
- From the drop down menu select the appropriate operating system for the image
- If the image file is not as you would like it, change it now (no spaces or special characters)
- If you are imaging a single partition Windows machine, select Single Partition
- Click Add
Create the Task
- Still in the host object, click on the Basic Tasks option on the left hand menu.
- Select Upload
- Click Upload Image
- Reboot client and it should pull an image from that computer.


