IPerf with snapins
The below tutorial works as far as setting up the backend and then running the script manually on the host. For some reason, the script does not run correctly when run as the SYSTEM user which is what all snapins run under. Plans to convert the scripts to powershell are underway.
Contents
What does this do?
A super fast method of testing available bandwidth available between the FOG server and a remote host and having the results view-able in a web browser. How amazing is that?
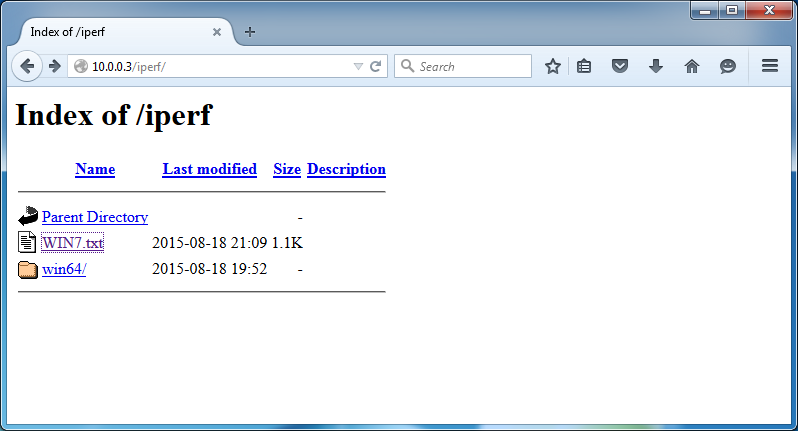
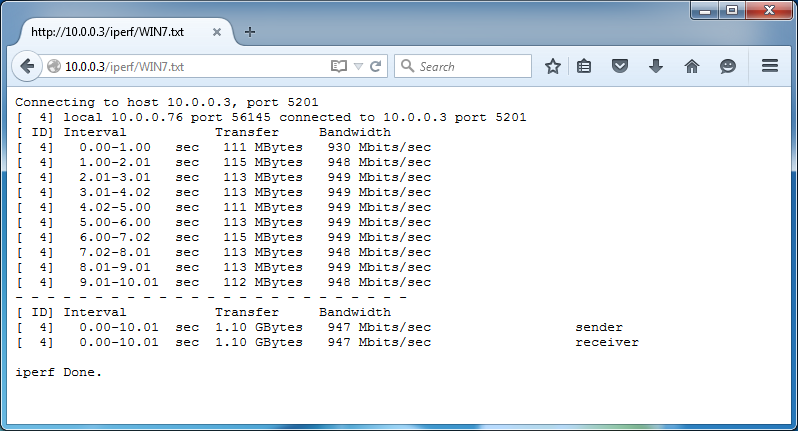
Here are some screen shots of the end product:
Specifics / considerations
Firstly - this is written for FOG 1.3.0 so the pictures of the FOG web UI will be different than 1.2.0 and the snapins area might look different and behave different. The Storage Management area will also look different and might behave different. However I don't expect any difficulties if this were used with 1.2.0.
This is a tutorial on how to create a throughput test for one or many hosts using iPerf and Snapins. The knowledge gained from such a test can be used in many ways - and this example code below might server as an example for more complex snapin creation for others.
This example uses Fedora 21 Server, iperf3 3.0.11-1, and Windows 7 64bit.
This should directly port to Fedora 22 by changing yum to dnf, and should work on CentOS 7 without any changes. To use this with Ubuntu/Debian, you will need to use apt-get and you'll need to remove the /http portion of the sym-link (I think). If other things are necessary, please let us know in the forums.
When following this, keep in mind that everything in Linux is case-sensitive. You must have hosts with the FOG Client installed and working in order to use this tutorial.
Setting up the back-end
On your FOG server, we need to create some directories, assign some permissions and ownership, and then download and extract the desired iperf version and extract the files. These things only need done one time, unless you want other versions of iPerf available too.
Here is a step-by-step guide on what the below commands do.
- Get the iperf installer from iperf's site using wget (distribution-specific).
- Install iperf (distribution-specific)
- Change directory to the one that contains the iperf executable. For Fedora 21, it happens to appear here: /usr/bin/iperf3 If you don't know where it is, search for it like this: find / | grep iperf3
- Run iperf in server mode and daemon mode. (can be made to run at boot every time - not in the scope of this tutorial)
- Make a directory in the root directory called iperf
- Create a sub directory in iperf called win64 (for organizational purposes).
- Use wget to get the required host files and then put them in the win64 directory with a more simple name of iperfwin64.zip (the URL needs adjusted for your needs and to get the latest version).
- Unzip the downloaded files into the win64 directory.
- Set permissions recursively so that everyone has access to the iperf directory.
- Recursively Set the apache user as the owner of this directory.
- Symbolically link the iperf directory to the web-root of the system (Fedora's is /var/www/html ).
wget https://iperf.fr/download/iperf_3.0/iperf3-3.0.11-1.fc22.x86_64.rpm
yum install -y iperf3-3.0.11-1.fc22.x86_64.rpm
cd /usr/bin
./iperf3 -s -D
mkdir /iperf
chmod -R 777 /iperf
chown -R apache:apache /iperf
mkdir /iperf/win64
wget -O /iperf/win64/iperfwin64.zip https://iperf.fr/download/iperf_3.0/iperf-3.0.11-win64.zip
unzip /iperf/win64/iperfwin64.zip -d /iperf/win64
chmod -R 777 /iperf
chown -R apache:apache /iperf
ln -s /iperf /var/www/html/
NOTE: If a trunk update makes this not work anymore, all you need to do is recreate the sym-link most likely; That's the last command just above. This is purposely designed to be very protected from FOG upgrades.
Setting up the snapin
This process will involve creating a simple batch file and uploading it as a snapin to FOG.
The first step is to create a batch file. Experienced users may already know this but this tutorial is written for everyone. :-)
Open notepad. Go to File -> Save As.
The filename must end with .bat, here's what I recommend: iPerfWithFOG.bat Change the "Save as type" field to "All Files" and then Click Save.
Copy and paste this stuff into the file and then go to File -> Save. The remarks explain what's happening.
- Change the IP address to your FOG server's address
- Change the username if necessary.
- Change the password. (find your username & password here: Storage Management -> [click storage node] -> Management Username & Management Password)
- Change file names as needed. To figure out what you need, just look into the iPerf download's extracted contents.
REM
REM Don't flip out about the "REM"s, they are remark lines in windows batch scripting. :-)
REM
REM Make a local directory on the c:\ partition called iperf.
REM
mkdir c:\iperf
REM
REM open FTP to the fog server Replace the IP address, username, and password as noted below.
REM we will generate a file on the fly to do this. The file will be here:  c:\iperf\download.txt
REM we use the echo and the pipe commands to fill the file with what we need on the fly.
REM
REM
REM file creation and our ftp open statement which has the IP of our FOG server. ------------------- CHANGE ME!
echo open 10.0.0.3> c:\iperf\download.txt
REM
REM username below ----------------------- CHANGE ME!
echo fog>> c:\iperf\download.txt
REM
REM password below. ------------------- CHANGE ME!
echo MySuperSecretPassword>> c:\iperf\download.txt
REM
REM get the files from FOG to the local iperf folder - these file names will change as time goes by - you will have to correct them as needed.
REM
REM ------------------- CHANGE ME as needed!
echo get /iperf/win64/cygstdc++-6.dll c:\iperf\cygstdc++-6.dll>> c:\iperf\download.txt
echo get /iperf/win64/cygwin1.dll c:\iperf\cygwin1.dll>> c:\iperf\download.txt
echo get /iperf/win64/iperf3.exe c:\iperf\iperf3.exe>> c:\iperf\download.txt
REM
REM close the connection
echo quit>> c:\iperf\download.txt
REM
REM run the file
ftp -s:"c:\iperf\download.txt"
REM
REM change directory and then run iperf.
REM
REM Change the IP! :-)
REM DO NOT change the %computername%, it's an environment variable. :-)
REM
c:\iperf\iperf3.exe -c 10.0.0.3> c:\iperf\%computername%.txt
REM
REM
REM
REM Now to reconnect to FTP, upload the files and disconnect.
REM As before, change the IP, username and password ad needed.
REM for uploading, we will generate the script for this and then execute it.
REM ------------------- CHANGE ME!
echo open 10.0.0.3> c:\iperf\upload.txt
REM
REM username below. ------------------- CHANGE ME!
echo fog>> c:\iperf\upload.txt
REM
REM password below. ------------------- CHANGE ME!
echo MySuperSecretPassword>> c:\iperf\upload.txt
REM
REM
REM Delete any pre-existing file for this host.
echo delete /iperf/%computername%.txt>> c:\iperf\upload.txt
REM
REM
echo put c:\iperf\%computername%.txt /iperf/%computername%.txt>> c:\iperf\upload.txt
REM
REM close the connection
echo quit>> c:\iperf\upload.txt
REM
REM now run the generated file.
ftp -s:"c:\iperf\upload.txt"
REM
REM
REM Clean up after yourself - delete the iperf work directory.
REM
rd /s /q c:\iperf
exit
- Save your work again.
Now we must upload to FOG. Navigate to the FOG web console and log in.
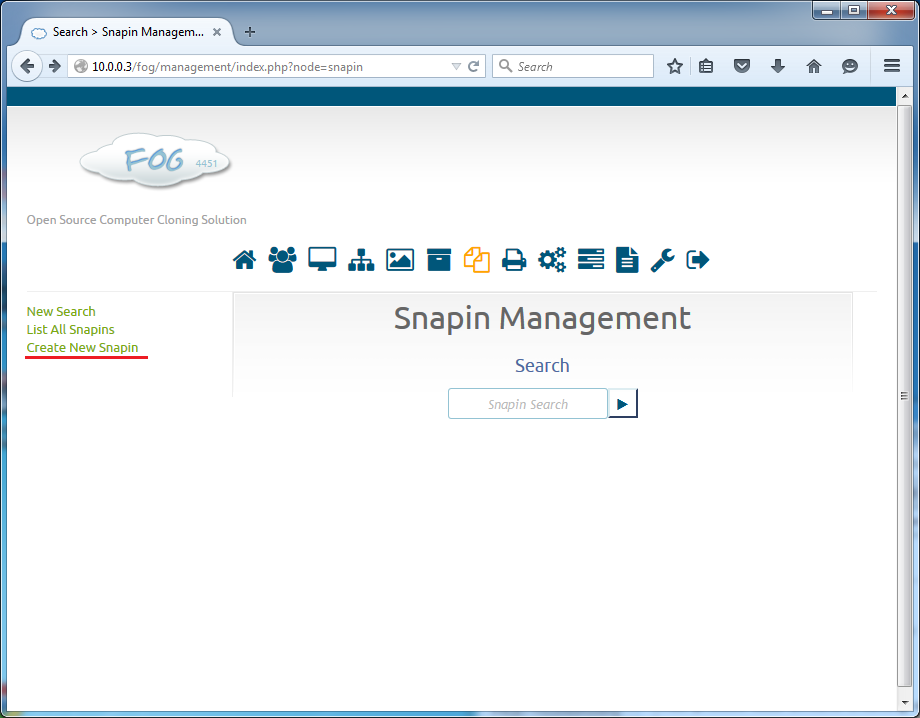
Go here: Snapin Management -> Create New Snapin.
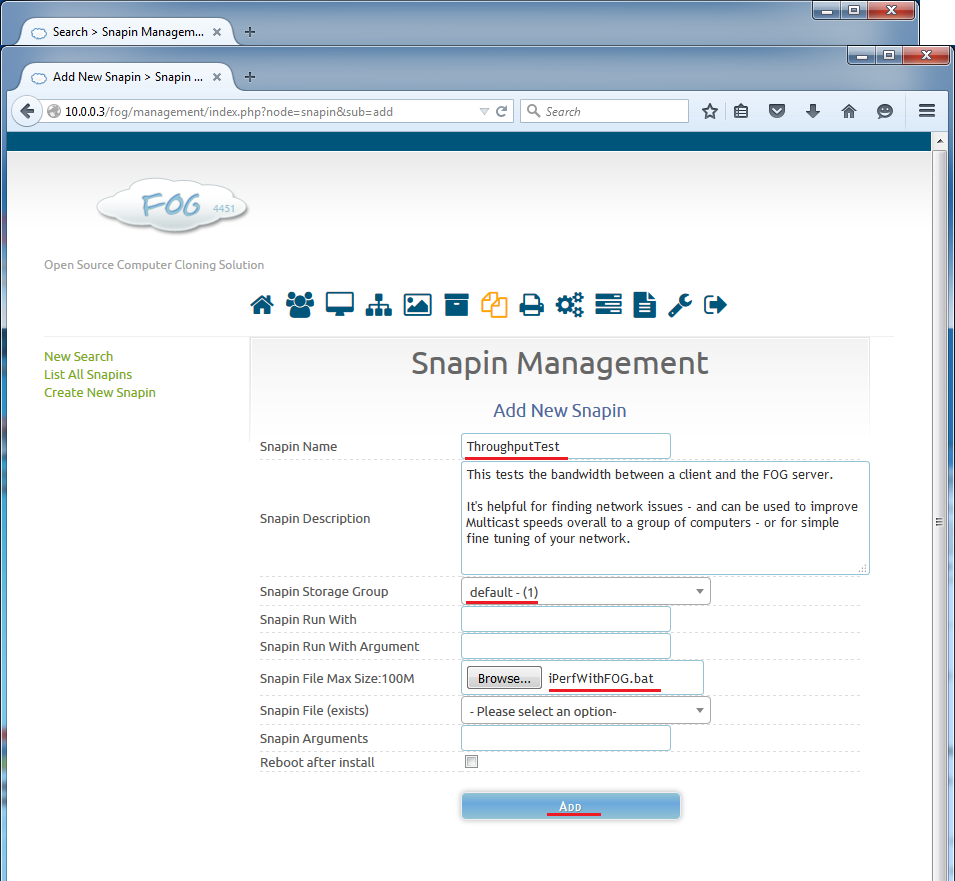
Create a Snapin similar to this, upload your batch file and then click add.
Deploy Snapin
This tutorial assumes you have at least one host with the FOG Client installed and functional.
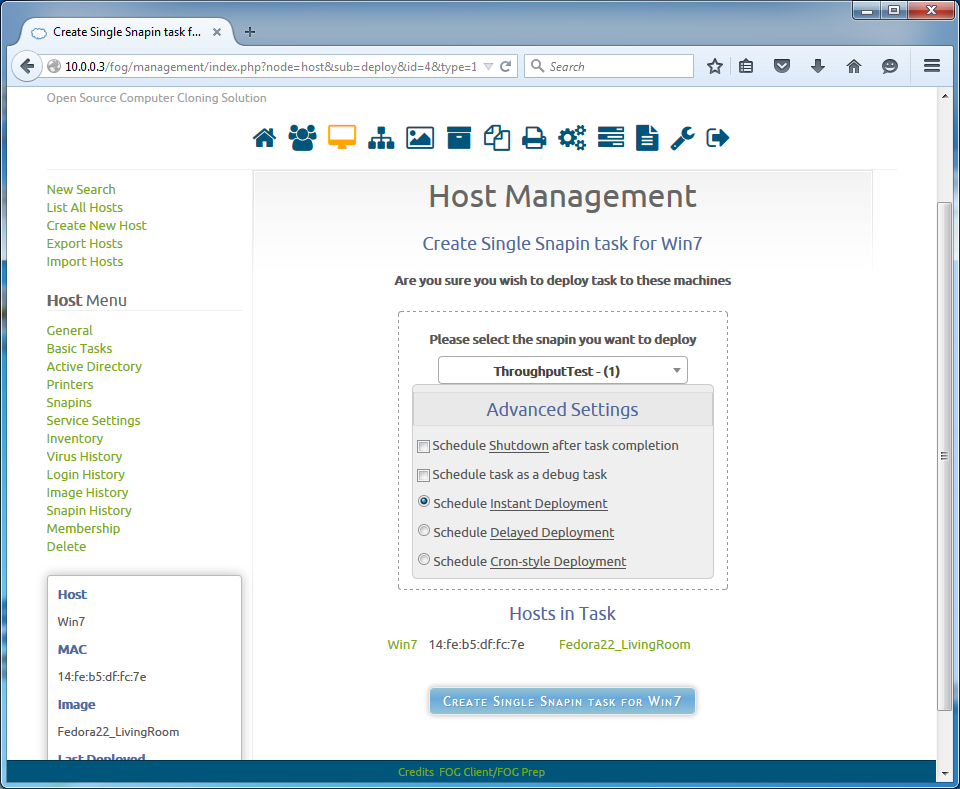
To deploy the snapin to a single host, navigate through here: Host Management -> List All Hosts -> [click the desired host] -> Basic Tasks -> Advanced -> Single Snapin -> [pick the snapin] -> Create Single Snapin Task.
It should look like this:
You are done.
After the snapin completes - look at the results by navigating to your FOG server's new web directory:
x.x.x.x/iperf
Go ahead, click on the file in there. :-)
