Installation on 7.10
Contents
Overview
In this tutorial we are using the 7.10 Desktop (live cd) release of Ubuntu, but FOG can also be installed on any later version of the desktop and server edition.
Video of FOG installation on Ubuntu 8.10 http://www.youtube.com/watch?v=fvltHkAtW2A&fmt=18
Known Issues
Language Issue
This tutorial will probably only work with the English Installation of Ubuntu.
PCMCIA NIC Initialization Issue
The installer for Ubuntu 7.10 server does not initialize PCMCIA NICs during the installation process. Because of this the installation must be done with a different NIC. If PCMCIA is the only option (e.g. with an older laptop), then use a more current version of Ubuntu. Ubuntu 10.x Server is known to work with PCMCIA NICs during installation.
Installing Ubuntu
An Ubuntu cd/dvd can be obtained from:
After burning a cd/dvd of the ISO image, we must boot the live cd.
After the live cd has loaded, double click on the Install icon on the desktop.
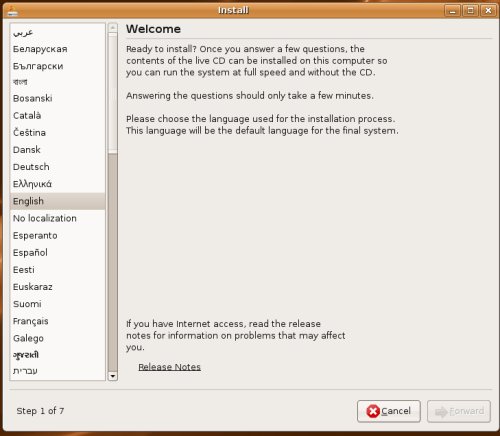
The first screen that loads will ask for your language preference, in this example we will select English and click forward.
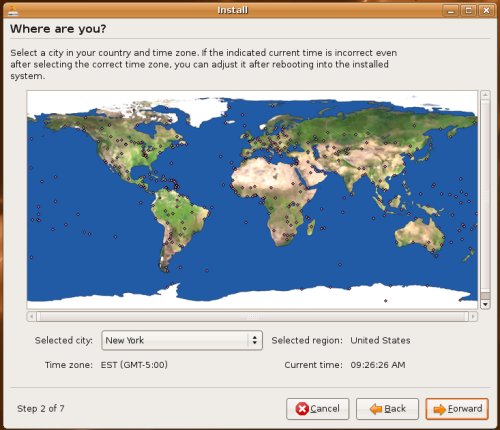
The next screen will ask you about your time zone settings, in our example we will select Chicago and click forward.
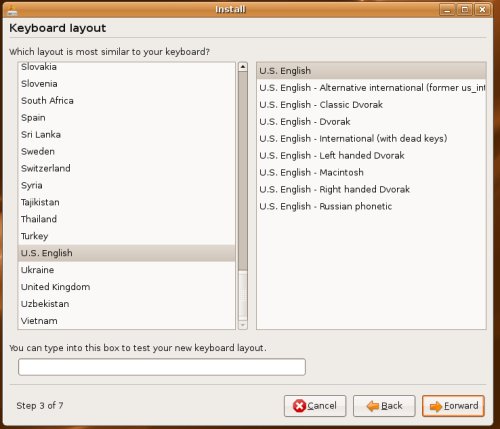
The following screen will ask you for your keyboard layout, in our example we will select U.S. English and click forward.
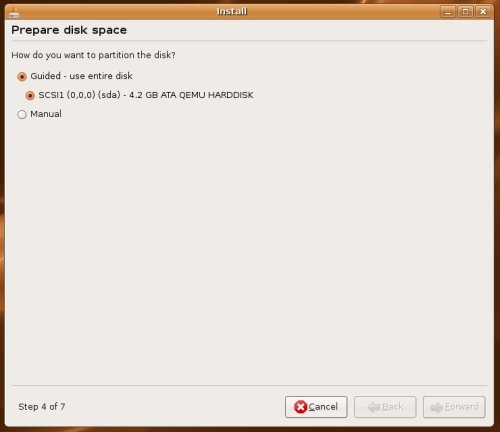
The next screen will prompt you for partitioning information, we will select to use entire disk, and click forward.
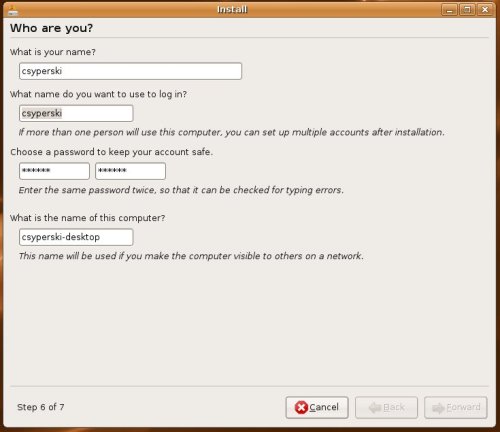
Now you will need to enter some user account information, enter the required information and click, forward.
On the final screen, click install to start the installation process.
At this point the installer will take over, this process may take a long time, so please be patient.
When you are prompted to either Restart Now or Continue using live CD', select Restart Now.
After the computer restarts, login with the user you created during installation.
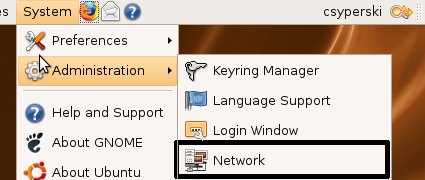
Now we need to set a static IP address, to do this we will go to:
System -> Administration -> Network
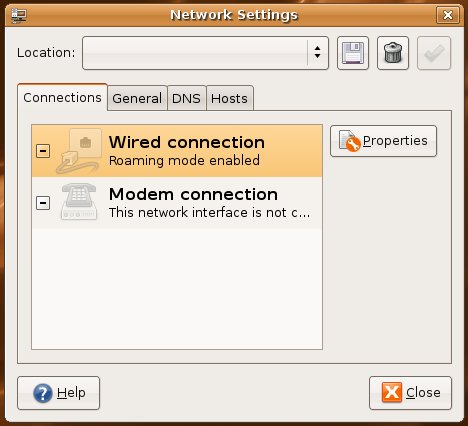
Now select Wired Connection and click on Properties.
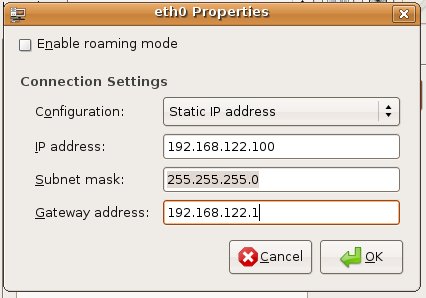
On the interface properties screen, uncheck Enable Roaming Profile, set configuration to Static IP Address, then enter your network information below and click OK.
Now click on the DNS tab and enter a DNS address, then click OK.
or command line
sudo nano -w /etc/network/interfaces
# The loopback network interface
auto lo
iface lo inet loopback
#
# The primary network interface
auto eth0
iface eth0 inet static
   address 192.168.0.150
   netmask 255.255.255.0
   gateway 192.168.0.1
If you have a proxy server between the FOG server and the Internet then make sure you also go into System > Preferences > Network Proxy and fill in your settings, including a username and password in the Details section. Even doing this I was still unable to perform an apt-get update so I needed to give the IP Address of the FOG server explicit rights to bypass the proxy (these are settings on your proxy server therefore we cannot provide information on how to do this as it varies greatly from system to system).
Setting up FOG on Ubuntu
Now we must download the FOG package from sourceforge. To do this click on Applications -> Internet -> Firefox Web Browser and enter the URL
http://www.sf.net/projects/freeghost.
Then click on the Download link.
Then click on the latest release to start the download and save the package to the /opt directory. It should be named something like fog_x.xx.tar.gz
or by using command line
cd /opt
sudo wget http://downloads.sourceforge.net/freeghost/fog_x.xx.tar.gz
Open a terminal (Applications -> Accessories -> Terminal) and type:
cd /opt
sudo tar -xvzf fog*
cd fog*
cd bin
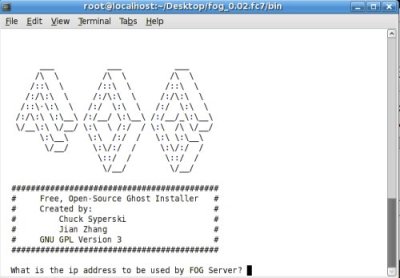
sudo ./installfog.sh
You will be prompted for the Linux distro you are installing, enter 2 and press enter.
You will be prompted for the installation mode, either N (Normal Server) or S(Storage Server). If you are not sure which option to select, use N for Normal Installation. (Version 0.24 and up)
The installer will ask you for the IP address of the server, then press enter.
The installer will ask if you would like to enter a router address for DHCP, if you would like to press y and press enter, then enter the address, then press enter.
The installer will ask if you would like to enter a DNS address for DHCP and the boot image, if you would like to press y and press enter, then enter the address, then press enter.
You would then be prompted if you would like to change the default interface from eth0, if you would like press y, press enter and add the interface (if you are unsure, select n).
Would you like to use the FOG server for dhcp service? [Y/n]

DHCP will not be setup but you must setup your

current DHCP server to use FOG for pxe services.

On a Linux DHCP server you must set:

next-server

On a Windows DHCP server you must set:

option 066 & 067

FOG now has everything it needs to setup your server, but please
understand that this script will overwrite any setting you may
have setup for services like DHCP, apache, pxe, tftp, and NFS.

It is not recommended that you install this on a production system
as this script modifies many of your system settings.

This script should be run by the root user on Fedora, or with sudo on Ubuntu.

Here are the settings FOG will use:
        Distro: Ubuntu
        Server IP Address: 192.168.0.150
        DHCP router Address: 192.168.0.1
        DHCP DNS Address: 192.168.0.150
        Interface: eth0
        Using FOG DHCP: 0
Are you sure you wish to continue (Y/N) Y
During the installation you may be prompted to set a MySQL root password, leave this blank unless you wish to edit the FOG config.php files before the next step (by using sudo vi in the terminal, see file locations below).
/opt/fog/service/etc/config.php and /var/www/fog/commons/config.php
Both of these have to be edited with the MySQL password if you set one, for Fog to function properly.
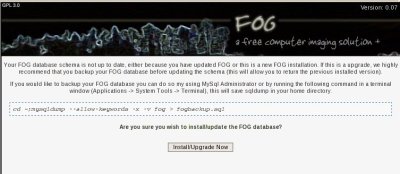
After the installation has completed open Firefox again and enter the URL: http://[youripaddress]/fog/management. You will then be prompted to install the database schema. Click on the Install/Update Now button.
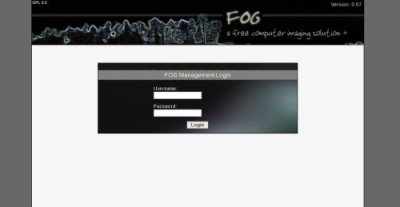
When the schema is up to date, attempt to go to the URL: http://[youripaddress]/fog/management again. This time you should be prompted to login
username: fog
password: password.
Setting up Wake On Lan
NOTE: The following settings do not apply to Ubuntu 7.10.
If you would like to use wake on lan with FOG, you will have to run the following commands as root:
visudo
Scroll to the line that says
Defaults requiretty
Press i to enter insert mode. Change the line to:
# Defaults requiretty
Now type:
:wq
and press the enter key.
Testing your installation
After login, click on the Hosts button (single computer monitor).
Then click on the Add New Host button. Enter at least a MAC address (seperated by :) and a hostname and click the Add button.
Now click on the Tasks button (the star).
Then click on List All Hosts and find the host you just created and click on the Advanced button.
Now under Advanced Actions click on Memtest86+ and confirm that you would like to start the task.
Now click on Active Tasks and you should see the task that you just created listed.
Lastly, start the client computer that you created a task for and ensure that in BIOS, PXE boot has the highest boot priority. If everything worked correctly, you should see memtest86+ load.
